Introduction
Hybrid Integration allows access from webMethods.io Integration cloud environment to webMethods on premise Integration Server. As a result, you can consume data from your on-premises applications and use those applications in your Workflow or FlowService in webMethods.io cloud environment.
In this Article we will walk through -
1)How to setup connectivity between webMethods.io cloud environment to webMethods on premise integration server.
2)Create a flow service within on promise webMethods integration server and upload the flow service as an application to webMethods.io Cloud environment.
3)Creating a workflow in webMethods.io integration environment and invoke the uploaded application as a connector.
Pre-requisite
To configure Hybrid Integration “WmCloud ” package must be installed and enabled in the on premise Integration Server.
Steps to follow
Step 1: Setting up connectivity from webMethods.io cloud environment to webMethods on premise Integration server:
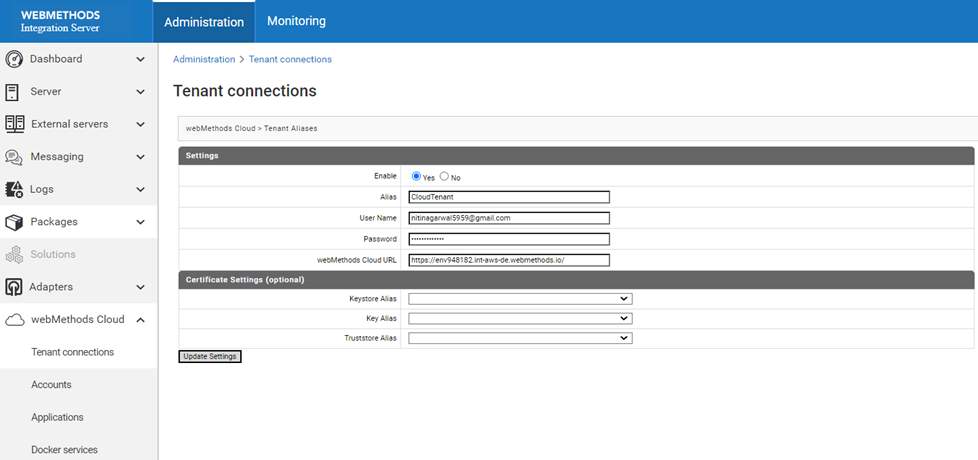
a) Firstly we have to open on premise integration server and navigate to webMethods Cloud → Tenant connections → create tenant connections to create tenant connection for the cloud environment.
Provide the details like Alias (any name), username, password , webMethods Cloud URL for the respective webMethods.io cloud environment and then click on update setting.
Note: webMethods Cloud URL can be copied from your cloud environment web UI like below:

As soon as we click on update setting you will see success message which means connection from on premise to cloud environment is established.
b) The next step is to create on premise account. For that navigate to webMethods Cloud → Accounts tab in your on premise integration server and then click on Create on premise account.

Provide the details like Alias Name (you can provide any name) , Description, Tenant Alias (same as created in previous step), Stage. Account settings can be kept default, provide Run as User Administrator and click on Save changes.
Account Settings:
Maximum Reconnection Attempts : Specify the maximum number of reconnections attempts that Integration Server should make if the connection to Integration Cloud fails.
Request Timeout : Maximum amount of time (in milliseconds) that Integration Cloud waits for the on-premise Integration Server to process a request.
Time to Live : If you are batching the data from the on-premise Integration Server, the length of time in seconds that the execution results remain in the cache of the on-premise Integration Server. The value must be greater than 0. The default is 60 seconds.
Allowed On-Premise Hosts : (Optional.) The on-premise Integration Server might use multiple addresses, depending on which network or proxy it uses to access Integration Cloud. Specify a comma-separated list of IP addresses that can receive requests from Integration Cloud. Only those IP addresses specified can receive requests.
Run As User : The user name you want the on-premise Integration Server to use when running the service. You can select users from the local or central directory.
After that you can test the account by clicking on Test icon and a message should appear like the account is valid as below:

c) The next step is we need to upload the on premise account to webMethods.io cloud environment. For this click on Upload under Accounts tab and click ok.

On clicking Ok the account will be uploaded to webMethods.io cloud environment:

Step 2: Create a flow service within on promise integration server and upload to webMethods.io Cloud environment:
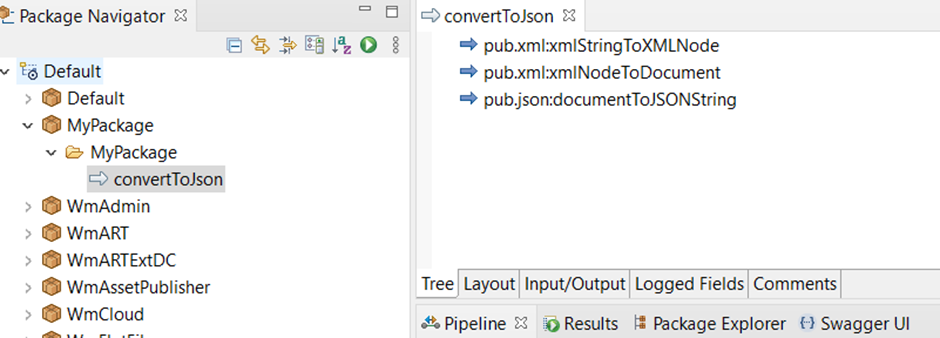
a) First we need to open webMethods designer of the on premise setup and create a sample flow service (eg: MyPackage:convertToJson) as below which converts the input xmlString to output jsonString:

b)The next step is we want this flow service to be uploaded to webMethods.io cloud environment as an application so it can be invoked directly from webMethods.io environment.
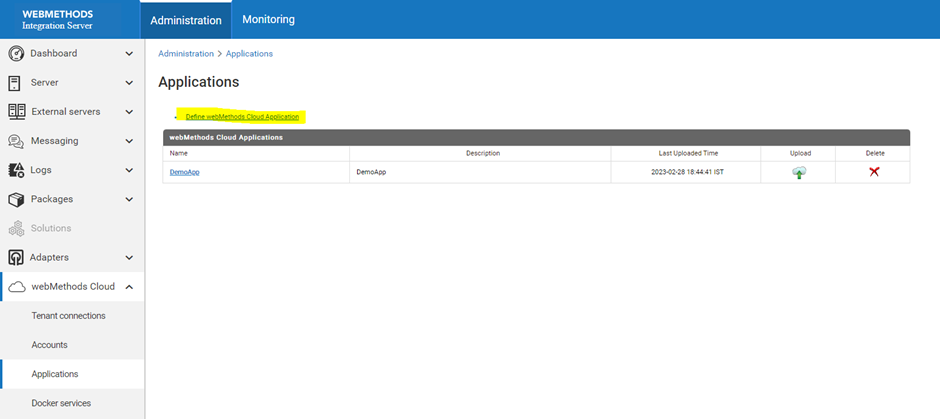
Navigate to on premise Integration server UI → webMethods Cloud → Application
Click on Define webMethods Cloud Application.

Provide a Name to Cloud application and Description.
In Assign Services to Application, select the flow service you want to upload to cloud environment for eg: we have selected MyPackage:convertToJson flow service.
Click on save changes.
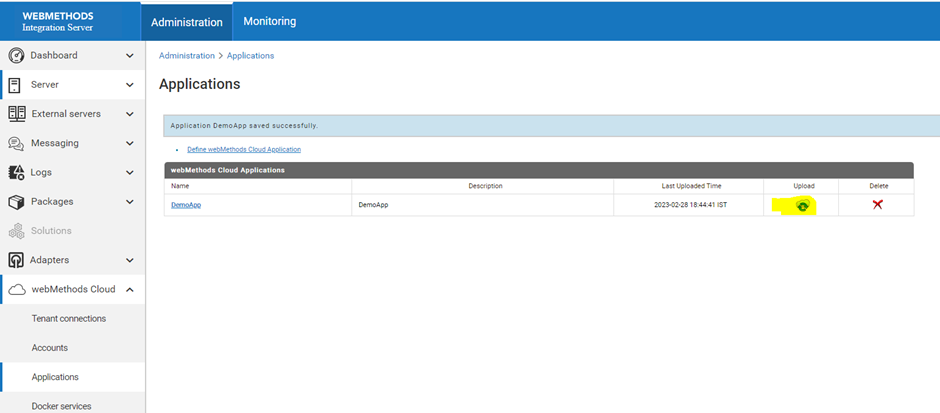
c) The next step is to upload this application to webMethods.io cloud environment.
For this click on Upload icon in the Applications tab as below:
Select the account we have created previously as below and click on upload button.
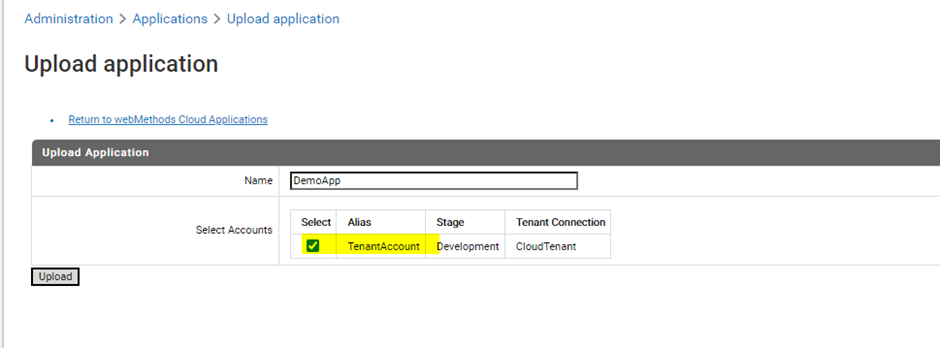
We will get a success message that Application is uploaded successfully to cloud environment:

The uploaded application can now be seen within cloud environment or can be used as a connector to invoke the on premise flow service.
Note : Applications uploaded from the on-premises Integration Server are listed in the Projects → Connectors → On-Premises Connectors page in webMethods.io Integration as below:

Step 3: Creating a workflow in webMethods.io cloud environment and invoke the uploaded application as a connector
In previous step we had uploaded the on premise flow service as an application to cloud environment.
In this step we will create a workflow and then invoke the uploaded application as a connector which can directly invoke the on premise flow service from webMethods.io cloud environment.
Go to webMethods.io cloud environment and create a project by clicking + icon as below:

Provide a name to the project and click on Create:

Create a Workflow within project by clicking on + icon as below:

Click on create new workflow as below:

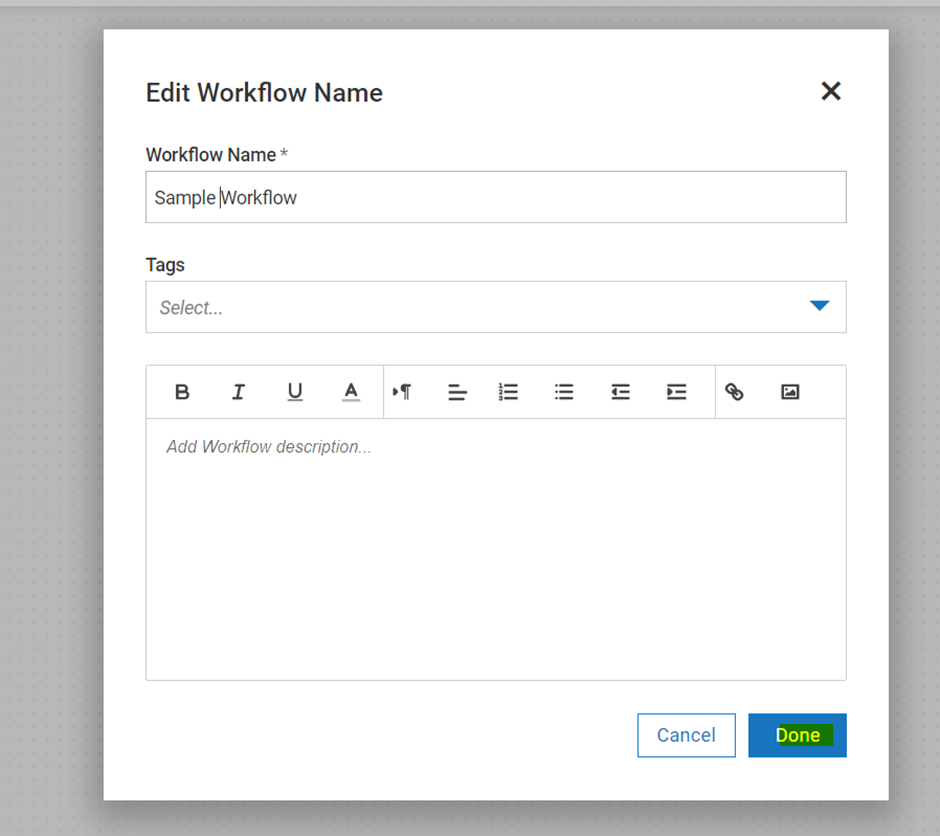
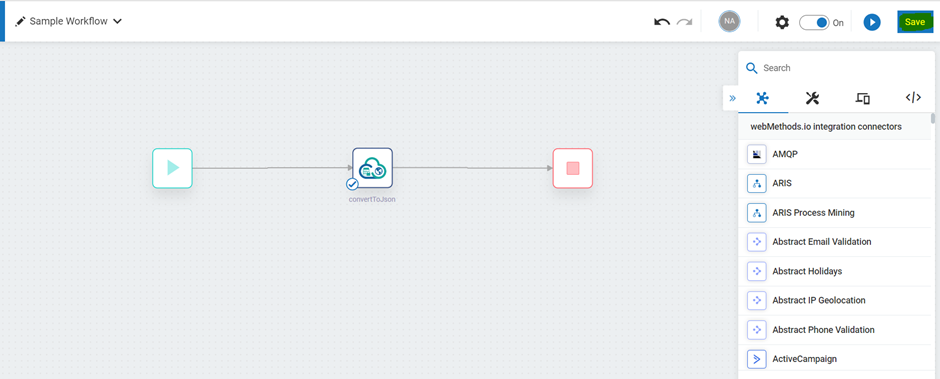
You will see a canvas like below with a start and stop steps. Click on pencil icon to give a name to the workflow:

Give a name to the workflow and click on Done:
On the right side Search screen look for DemoApp we had uploaded to cloud environment and then drag DemoApp connector to the canvas as below:

Connect a transition line from DemoApp to the Stop step:

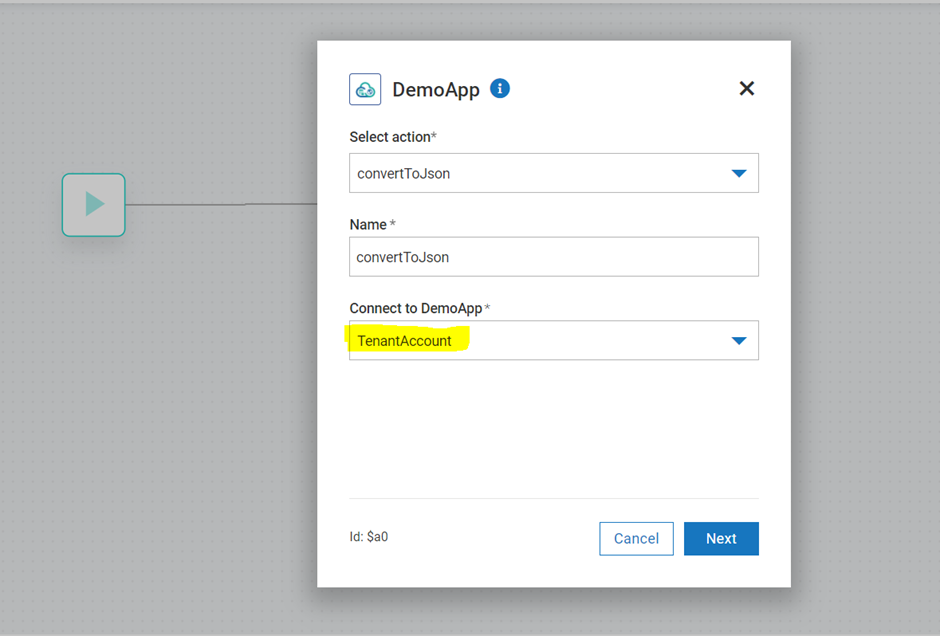
To configure DemoApp connector double click on DemoApp connector.
In Connect to DemoApp option Select the TenantAccount and click on Next:
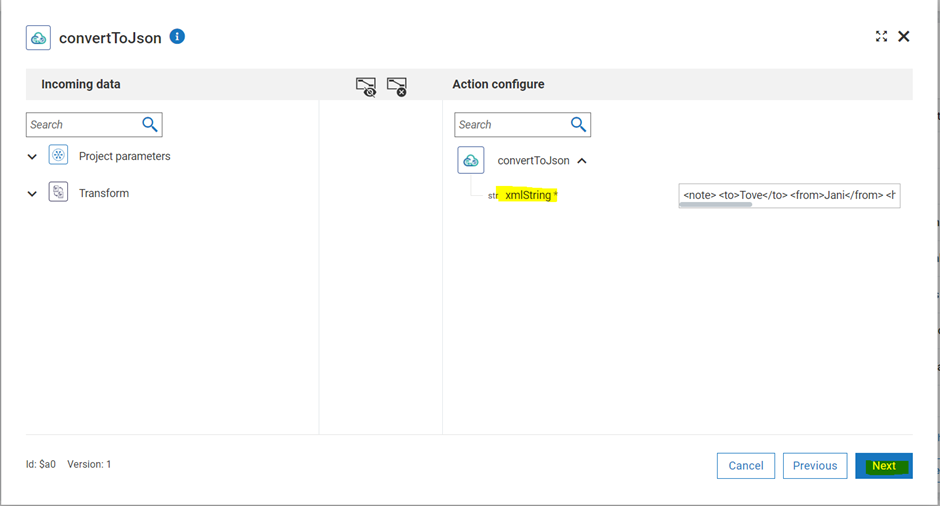
Provide the xmlString in the xmlString box which you want to convert to Json and click on Next
Click on Test which will do a test run to the DemoApp connector:

We can see that test run is producing the desired output as jsonString as below

Click on Done and then click on Save to save the workflow.
Search for logger connector on the search bar and drag it on the canvas. The Logger will be used to log the output of the ConvertToJson connector.

To configure the Logger double click on it and click Next (You may want to adjust the transition lines )


Drag jsonString from left side pipeline data to the Log Data field on right side.
This will create a mapping from jsonString to Log Data as below:

This will be used to log jsonString Data which is the output of our flow service.
Then click on Next → Test → Click on Done
Now save the workflow using Save button:

So we have created Sample Workflow which calls DempApp (ConvertToJson) connector that internally invokes on premise flow service to convert input xmlString to output jsonString and the logger logs the output jsonString.
Now to run this workflow click on run icon at top right side:

Once the workflow has run successfully, we will see the transition lines will appear green as below which means workflow has run successfully:

To verify the logs click on <> icon at bottom left:
Click on Logs:

We can able to see the logged jsonString Data as below which is the output of our on premise flow service.

Useful links | Relevant resources
For more details in regards to webMethods.io documentation please refer the link :
Overview - webMethods.io Integration
General Notes
- The maximum size limit for hybrid messages that can be transported between on-premises webMethods Integration Server and webMethods.io Integration is 25 MB
Execution Settings
When we click on gear icon at top right side we have 5 different setting as below:

a)Auto Connect:
Auto connect can be disabled and enabled from workflow execution settings. when you enable auto connect it will automatically connect the transition line to the nearest connector.
b)Show real time visualization of workflow when executed via webhook or trigger:
For a workflow type of webhook or trigger when you enable this option, as soon as the workflow starts executing it shows a green line indicating the flow direction using various connectors
c)Retry execution failed actions 3 times before stopping the workflow:
When you enable this option, in case of a workflow failure the execution will be retried for 3 times before the workflow is stopped.
d)Save status of each successfully executed action:
When enabled this option it will save the status of last successfully execute action.
e)Maintain workflow execution logs when executed via webhook or trigger:
In Workflow Settings, the Maintain workflow execution logs when executed via webhook or trigger option is unchecked by default.
To view the input/output details associated with each action of the workflow in the debug panel as well as under the workflow execution logs, go to Workflow > Settings > Execution Settings and select the Maintain workflow execution logs when executed via webhook or trigger option.
Points to note while sharing on premise services through an application
- You can share only services running on the on-premises Integration Server configured to create applications on webMethods.io Integration.
- You can share only services contained in custom packages.
- You can share services from different packages in the same application. For example, if service A is located in package A, and service B is located in package B, you can add both service A and service B to the same application.
- You can share only those services whose signatures are of the following data types: String, String List, Document, Document Reference, Document List, Document Reference List, Object, Object List.
- You can share only those services that have an input and/or output signature specified.
- You cannot share service signatures that include cyclical dependencies of document references, fields of type String Table, including fields of type String Table in a Document, and an empty Document or Document List.
- You must configure one or more accounts to associate with the application before you can upload the application to webMethods.io Integration.
