Duration: 30 minutes
The following exercises will help you to sharpen basic skills needed to use the webMethods SAP Adapter. Exercises include discussions of the steps involved in performing the tasks listed. Finished packages are provided to show how services are built.
Prerequisites #
To get the most value out of this tutorial, a basic working knowledge of webMethods ESB services is helpful. Please complete the introductory tutorial:
- webMethods Flow Tutorial
- webMethods Integration Server is up and running. Instructions on how to start the IS are found in the Prerequisites part of the 1. Create an IS Package and Folders FLOW tutorial.
In addition, a basic knowledge of Software AG Designer is helpful, but not required.
Step Outline #
You use the webMethods SAP Adapter to communicate with SAP systems. The steps for establishing this communication are:
- Create a new IS Package and Folders
- Create an RFC Connection to SAP
- Create an SAP adapter service
- Run the adapter service
Step 1: Create a new IS Package and Folders #
In this Step: You will create a package to hold the SAP tutorial assets
1. Open Software AG Designer and go to the Service Development perspective by selecting the Service Development perspective toolbar button or by selecting Service Development from the Window -> Open Perspective -> Other… dialog and click OK.
2. From the Package Navigator view, right-click on Default, then select File -> New -> Package

3. In the New Integration Server Package dialog enter demoSAP in the Package name: field and click Finish.
4. Create a folder hierarchy by right-clicking on the demoSAP package, select New -> Folder, enter demosap in the Folder name: field and click Finish. Do this 2 more times to create 2 subfolders called sap and services by right-clicking on the demosap folder. The package should look like the following:
 |
Step 2: Configure an RFC connection to SAP #
In this Step: You will configure a synchronous RFC connection with your SAP system.
1. Open a web browser and navigate to the Integration Server administrator page located at <webMethods Integration Server (localhost)>:5555.
 |
2. Expand the Adapters menu header on the left menu bar and click the SAP Adapter… link.
 |
3. In the SAP Adapter Administration page click the Configure New Connection link to create a new SAP Adapter Connection to your SAP System. This starts a wizard that walks the user through creating a new connection.
4. Click the RFC connection link.
 |
5. The SAP adapter connection configuration page is now displayed. This page has many fields that support many SAP deployment architectures including clustered and SAP security. In this case, we will configure a simple SAP RFC connection to one server. Using the screenshot as an example, edit the values that conform to your SAP server.
 |
6. Click the Save Connection link at the bottom of the page. This saves the connection information and creates an SAP adapter connection object that is viewable from the Software AG Designer.
7. Enable the connection by clicking the No link under the Enabled column. Click the OK button to confirm you want to enable the connection.
 |
8. The SAP adapter connection should now be enabled.
 |
9. To see how the adapter connection is displayed in the IDE, go to Software AG Designer. Right click the demoSAP package and select Refresh. The package contents and structure should appear as shown.
 |
Step 3: Create an SAP adapter service #
In this Step: You will leverage the SAP adapter connection that we created in the first step and create an adapter service.
1. Right click on the sap folder of your tutorial package as shown and select New -> Adapter Service.

2. The adapter service wizard will prompt you for a name for the new service. We will be executing an SAP Remote Function Call (RFC) to get a listing of companies that are in the SAP system. In the Element name field, enter sapCompanyList and click Next >.

3. In the Select Adapter Type dialog, select SAP Adapter and click the Next > button.

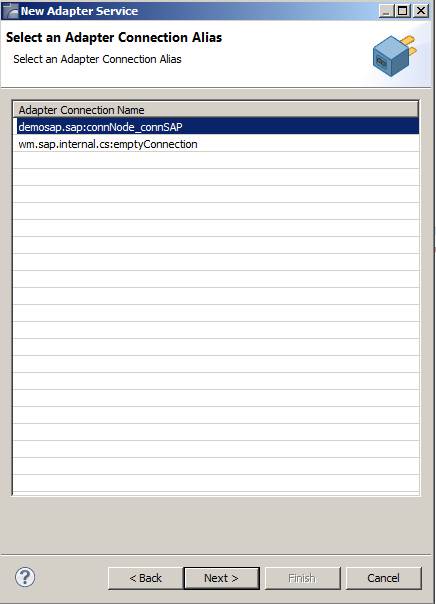
4. In the Select an Adapter Connection Alias dialog, you will see two connections displayed. The emptyConnection is used for advanced purposes. In our case, select the demosap.sap:connNode_connSAP connection which we created and enabled and click the Next > button.
5. In the Select a Template dialog select the RFC Adapter Service and click the Finish > button.
 |
6. You now have a new SAP Adapter Service. Go back to Software AG Designer, right-click on the demosap package and click the Refresh menu item. Double-click on the sapCompanyList adapter service in the Package Navigator view under the demosap.sap folder. You can configure the various fields of the adapter service. Type in BAPI*COMP* in the Function Pattern field and then Save (Control-S). This dynamically saves the query but also sends to SAP for a list of RFCs which match the pattern you specified. This makes it much easier to find RFCs for certain functionality. Note that the RFCs that are visible are also determined by the credentials which are used when we create the SAP connection. Using the dropdown, select the function name BAPI_COMPANYCODE_GETLIST.
 |
7. Once the function is selected, click Save (Control S). This queries SAP for the request and response signature. select the Reply Field Selection tab at the bottom of the adapter service editor. This shows the fields that the RFC has available to send back in a response. For our tutorial, select the two fields as shown by checking the checkbox under the Use column. Notice that these are arrays then Save (Control-S).
 |
8. The adapter service output tab will now reflect the fields which were selected. This makes mapping with other services very easy. The Software AG Designer IDE sometimes needs to be refreshed in order to reflect the changes. Select your service, right-click and click Refresh.
 |
Step 4: Run the adapter service #
In this Step: You will execute the synchronous RFC adapter service you created in Step 3.
1. Right-click on the sapCompanyList adapter service, then select Run As -> Run Service.

2. Since we configured the service to take no input parameters, it simply returns a listing consisting of the two fields we specified as the response. Your response will show up in a Results view on the bottom of the Software AG Designer IDE. Your results should look similar but will vary with the actual data within your SAP system.

Conclusion #
Congratulations, you have successfully created a connection to SAP and invoked an RFC on it. This service can now be re-used in flow in combination with other services.
To import the solution of this tutorial download demoSAP.zip and follow the directions in the Import an IS Package tutorial. You will still have to enter your SAP System credentials and enable the SAP Adapter Connection in the solution import according to Step 2 in this tutorial.
Read in this series:
- webMethods Flow Tutorial - No.1 Create an IS Package and Folders
-
webMethods Flow Tutorial - No.2 Create and Run a Flow Service
-
webMethods Flow Tutorial - No.3 Create Document Types
- webMethods Flow Tutorial - No.4 Create a LOOP Operation
-
webMethods Flow Tutorial - No.5 Create a BRANCH Operation
- webMethods Flow Tutorial - No.6 Create a SEQUENCE Operation
- Import an IS Package
-
File Drop Tutorial
- Flat File Processing Tutorial
-
webMethods JDBC Adapter tutorial - Create a JDBC Adapter Service
-
webMethods SAP Adapter Tutorial - Current tutorial
- Integrate with Salesforce.com using the CloudStreams Adapter