This post provides brief steps, on how to launch a UM 10.5 server as a container on Azure cloud env using Azure Kubernetes Services. I have also provided some sample commands / k8s YAML files, which can help you start and get running quickly. This article presumes, that you have some knowledge about Kubernetes, Azure, Docker, Universal Messaging, AZ CLI, and Kubectl. This knowledge might help you to understand, behind the scenes operations that are happening.
Pre-requisites:
- You should have kubectl, Azure CLI & Universal Messaging Enterprise Manager installed on your workstation. This is needed for you, to be able to issue commands to Azure K8s using the command line and connect to UM via EM, once it is up.
- Your workstation should have access to Azure portal and you should have an active Azure subscription as well, with the right privileges. This is needed for you, to be able to create/update resources on Azure.
- You should also have an active docker hub account, to be able to pull UM image from the Docker hub.
Important Notes:
- This article just gives us the bare minimum kick-start process, of how to do it. For an actual setup, many things need to consider in terms of : persistent volumes for persisting data, logs, channels etc. Also, it must be looked upon from a security perspective. I will try to write more articles/complement this article; on how to add channels, persistent volumes for logs/data directory, creating JMS assets, Connection Factories, setting A/P setup, setting up a DevOps process for this, etc.
- Also, if you are doing this POC on Azure, please remember that azure resources are chargeable and hence this can lead to monetary charges on your azure account. Please ensure to keep track of the consumption of Azure resources, and do the needful to keep the cost in check.
- The POC I have done is based on my knowledge of the Azure, K8s and UM and doesn’t necessarily say/recommend anything about the best possible way, or the best practices prescribed for doing it.
STEPS:
- Create a Kubernetes cluster on MS Azure. I have created a single node cluster in this example. Please see below. You can use Azure portal on the browser to do this activity. You can see this link for guidance on setting up a K8s cluster in Azure: https://docs.microsoft.com/en-us/azure/aks/kubernetes-walkthrough-portal

-
Login to your azure account using the below command from the command prompt. I have used a windows workstation. Normally the command would open a browser window, and will ask you to enter your azure account credentials and then you should get logged in. But, If you get the below message, it’s probably because you have MFA enabled for your Azure account. If you see this, use steps 3 & 4 to log in. But if you don’t get the below message and then you will get a screen as shown in step 4 below, and you can directly move on to step 5.
Command : az login

- Get your Azure AD tenant ID mentioned in the above screenshot from your Azure portal account. It can be found at below place.

- Use the below command if you saw the message for using tenant ID in step 3. This will open the Azure login page on your default browser, and then you will be prompted to enter a username, password and the MFA option (text message, approve on authenticator app, etc.) to complete the sign-in process. Once you get below output, it means you have successfully logged in.
Command : az login – tenant

- Connect to your Azure K8s instance from the command prompt. Please see below to see instructions on how to connect. Run the two commands shown below. az account set and az aks get credentials. These two commands should be run one after the other, in the order mentioned in the screenshot. This step will connect you, to your AKS cluster running on azure.
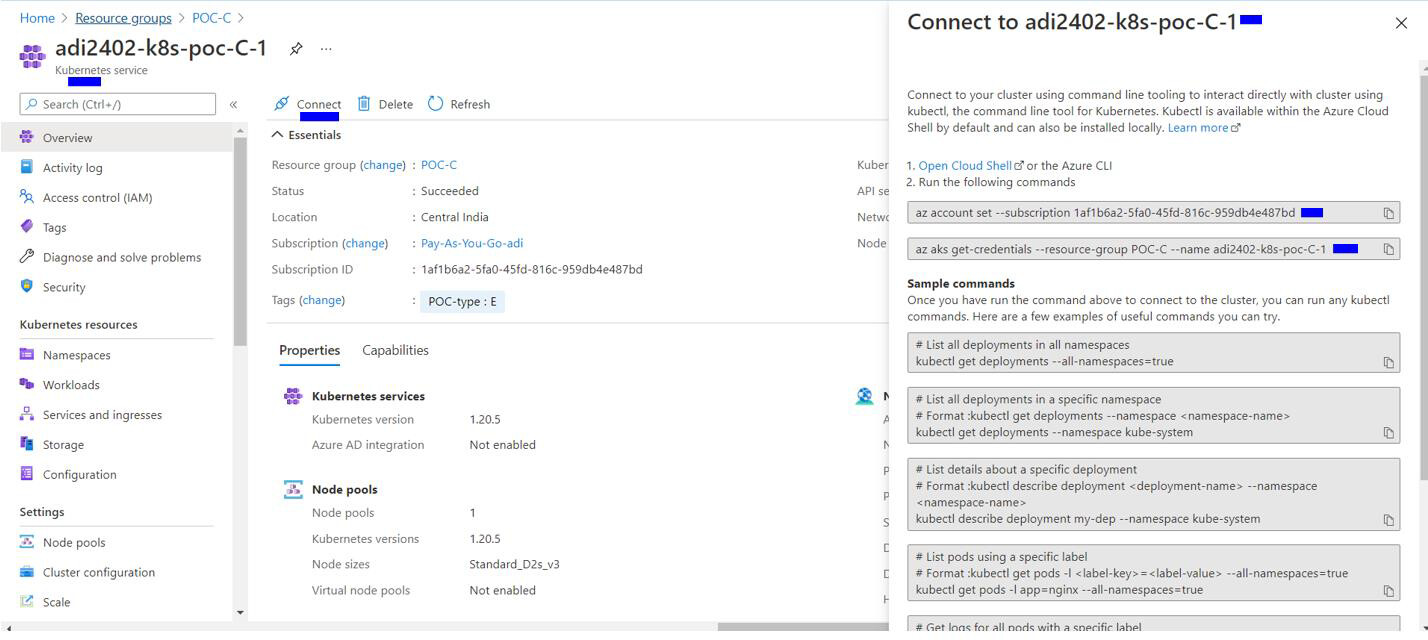
For eg:

-
Create a secret, for you to be able to use later, in pulling the UM docker image from the docker hub registry.
Command : kubectl create secret docker-registry regcred --docker-server= --docker-username= --docker-password= --docker-email=
-
Verify that secret has been created successfully using the below command.
Command : kubectl get secret

-
Create the static public IP that will be used to expose the UM server to external clients. This IP will be assigned to the Load Balancer service, which we will create in later steps. Sample command is given below.
Command: az network public-ip create --resource-group POC-C --region centralindia --name myAKSPublicIP --sku Standard --allocation-method static

-
Get the IP address created in step 8 using below command. Note down this IP. This will be used in later steps.
Command : az network public-ip show --resource-group POC-C --name myAKSPublicIP --query ipAddress --output tsv .
- Before creating a Load Balancer service, we need to ensure, that the cluster identity used by the AKS cluster, has the needed permissions to the resource group; so that it can perform the relevant operations related to networking. Follow below command to provide that access to the AKS cluster.
Sample command format: az role assignment create --assignee Client-ID --role “Network Contributor” --scope /subscriptions/subscription-id/resourceGroups/resource-group-name
Sample command: az role assignment create --assignee c3d83af8-0f94-4af4-8702-9abcbd3ae0f6 --role “Network Contributor” --scope /subscriptions/1af1b6a2-5fa0-45fd-816c-959db4e487bd/resourceGroups/POC-C
Here Client ID is of the AKS cluster and POC-C is my resource group name. 1af1b6a2-5fa0-45fd-816c-959db4e487bd is my subscription ID.

- Create the sample deployment YAML file , um-server.yml. This will be used to launch the UM POD (container). Keep it in the location, where kubectl.exe is present so that you can refer to this file easily when using the kubectl command.

- Create the sample Load Balancer YAML file, um-server-LB-port.yml. This will be used to create the Load Balancer service. Please ensure to put the same IP below, that you got in above steps 8 & 9. Keep this file in the location where kubectl.exe is present so that you can refer to this file easily when using kubectl command.

- Use kubectl apply -f command to launch the UM pods. Here um-server.yml file is the YAML file we created in step 11. Use kubectl get pods commands to see, whether the UM is finally up and running. You can notice the READY column and STATUS column to determine.

- Use the kubectl apply -f command to launch the Load Balancer svc. Here um-server-LB-port.yml is the YAML file we created in step 12 for the Load Balancer service. Use kubectl describe svc command, to see if the LB svc has been created successfully. If it is successfully created, then you will be able to see the EXTERNAL IP assigned to the svc.

- Use the external IP to connect to the UM via Enterprise Manager.

Conclusion:
So we saw in the above steps, how to quickly spin up a UM container on Microsoft Azure using Azure Kubernetes Services. We were also able to connect to the UM using our EM. Hope this articles helps you to quickly get started, and provide you the very first steps on how to do it.
I will keep adding more to this topic in the future. Thanks for reading.
Glossary:
- K8s: Kubernetes
- LB: Load Balancer
- Azure: Microsoft Azure Public Cloud
- Env: environment
- UM: Universal Messaging
- Svc: Service
- EM : Enterprise Manager
- AZ CLI: Azure Command Line Interface
- A/P: Active Passive