Overview
The eighth chapter explains the topic multi-language in custom widgets.
This chapter is recommended for anyone planning to add multiple language support for custom widgets used in MZNG 10.3.
The basis for chapter eight is a custom widget that uses the data assignment as it was explained and created in chapter three.
Widget Preview
The custom widget “Demo widget 8” will behave like “Demo widget 7”, but additionally support internationalization.
Resulting files
Demo widget 8 consists of the following directories and files.
As compared to the structure of “Demo widget 7” the following folders and files were added or changed :
\---customWidgets
   \--- demoWidget8

          |     demoWidget8Config.js
          |     demoWidget8Module.js
          |
          +---assets
          |     +---css
          |     |         widget_demoWidget8.less
          |     |
          |     \---images
          |               demoWidget8MenuIcon_32x32.png
          |
          +---js
          |         demoWidget8AssignDataCtrl.js
          |         demoWidget8Ctrl.js
          |         demoWidget8DataService.js
          |
          \---partials
               |   demoWidget8.html
               |
               \--- assignDataDialog
                     |   advancedProperties.html
                     |   assignColumns.html
                     |   assignData.html
                     |   thresholdProperties.html
                     |
                     \---  columnTypeConfigTemplates
                               date.html
                               numeric.html
                               text.html
The created files and source code accompanying this article can be downloaded here.
Creation steps
Step 1: Enable the action framework in the custom widget configuration
In order to use the multi-language for a custom widget, it must be activated in the custom widget configuration.
Therefore please edit the custom widget configuration file demoWidget8Config.js and add the action " translate " as shown in the example below.
demoWidget8Config.js
angular.module('demoWidget8Module')

    /**
     * Configuration for the custom widget
     * The config contains all configurable properties of the widget
     */
    .config(['dashboardProviderProvider','columnTypeConfigUrlServiceProvider',
        function (dashboardProviderProvider, columnTypeConfigUrlServiceProvider) {
            dashboardProviderProvider.widget('demoWidget6', {
                title: 'Demo Widget 8',

...
                actions: [
...
                    'translate',
...
                ],
...
Explanation: Adding the action “translate” in the custom widget configuration (see line #15), will enable the widget for using the multi-language framework.
As a result the widget properties menu will show the action icon “Translate”.

Clicking on the “Translate” action icon will open the “Translations”-view:
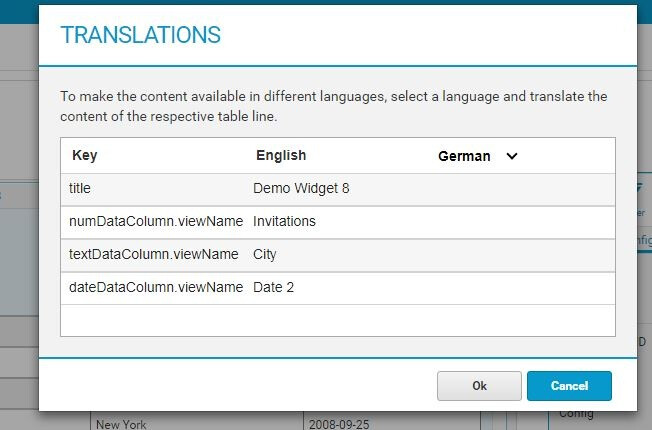
Explanation: The purpose of the “Translate”-view is the addition of translations for a widget.
Step 2: Defining the translation keys for a custom widget
In order to enable multi-language for a widget, the widget implementation must extend the widget interface.
Therefore please edit the custom widget configuration file demoWidget8Config.js and extend the widget interface as shown in the code example below.
demoWidget8Config.js
angular.module('demoWidget8Module')
    /**
     * Configuration for the custom widget
     * The config contains all configurable properties of the widget
     */
    .config(['dashboardProviderProvider','columnTypeConfigUrlServiceProvider',
        function (dashboardProviderProvider, columnTypeConfigUrlServiceProvider) {
            dashboardProviderProvider.widget('demoWidget5', {
                title: 'Demo Widget 8',
...
                resolve: {
                    widgetInterface: function(config, demoWidget8DataService) {
                        config.widgetInterface = {
                            getDataMapping: demoWidget8DataService.getDataMapping,
                            calculateCoordinateList: demoWidget8DataService.calculateCoordinateList,
                            getTranslationKeys : demoWidget8DataService.getTranslationKeys,
                        };
                    }
                },
...
Explanation: In line #18 the widget interface function “getTranslationKeys” was added. It will be implemented in the custom widget data service and collects the translation keys (e.g. column name, axis, title, etc.). By implementing this interface function, the custom widget informs the widget framework about available translation keys (config variables) that can be used in the translation modal of the widget.
Step 3: Extend the data service to add getTranslationKeys
Therefore please edit the file demoWidget8DataService.js and add the function " getTranslationKeys(config) ".
demoWidget8DataService.js
angular.module('demoWidget8Module')

    /**
     * Data service for the custom widget
     * The data service defines the data mapping - the structure of the data delivered by the server
     */
    .service('demoWidget8DataService',['widgetDataService','formatNumberService','typeconstants',
        function(widgetDataService,formatNumberService,typeconstants) {
...
            return {

                getDataMapping : function(item) {
...
                },

                /**
                 * This function collects all coordinates (columns) provided by this custom widget.
                 * @param config The custom widget configuration
                 * @returns The coordinates provided by the custom widget
                 */
                calculateCoordinateList : function(config) {
...
                },


                /**
                 * This function collects all coordinates (columns) provided by this custom widget which needs to be translated.
                 * @param config The custom widget configuration
                 * @returns Array of objects containing "key"(path to variable from config), "value"(design language value) and "shortName"(to show in translation dialog).
                 */
                getTranslationKeys: function(config) {
                    var list = [];
                    if(config.assignedColumns && config.assignedColumns.numDataColumn){
                        list.push({
                            'key': "assignedColumns.numDataColumn.displayName",
                            'value': config.assignedColumns.numDataColumn.newName || config.assignedColumns.numDataColumn.name,
                            "shortName": "numDataColumn.displayName"
                        });
                    }


                    if(config.assignedColumns && config.assignedColumns.textDataColumn){
                        list.push({
                            'key': "assignedColumns.textDataColumn.displayName",
                            'value': config.assignedColumns.textDataColumn.newName || config.assignedColumns.textDataColumn.name,
                            "shortName": "textDataColumn.displayName"
                        });
                    }

                    if(config.assignedColumns && config.assignedColumns.dateDataColumn){
                        list.push({
                            'key': "assignedColumns.dateDataColumn.displayName",
                            'value': config.assignedColumns.dateDataColumn.newName || config.assignedColumns.numDataColumn.name,
                            "shortName": "dateDataColumn.displayName"
                        });
                    }

                    return list;
                }

            };
        }
    ]);
Explanation: The function “getTranslationKeys(config)”, starting at line #31, creates an array containing objects with three parameters:
- “key” - the path to the variable from the config object,
- “value” - the design langauge value and
- “shortName” - the name to show in the translation dialog
This array defines the properties that are involved in the widget translation.
In the screenshot above the translation dialog for the custom widget “Demo Widget 8” is shown. It provides all properties available for translation. Note that the key is the string representation of the path from the config object to the property.
Important: The property “displayName” used above is different from the property “newName” which is used as a column Name for the data mappings. The two properties have to be separated into different variables using “newName” for retrieving the data and “displayName” for rendering the widget. One cannot use the same property for both since it will break the retrieval of data when we switch the language.
Step 4: Extend the custom widget view to use the new property from getTranslationKeys for rendering the view
The custom widgets should now use the new property from the getTranslationKeys implementation, Therefore please edit the custom widget view template demoWidget8.html and enrich change the headers to use the property from the config:
demoWidget8.html
<!--This is the view template for Demo Widget 8-->
<div class="demoWidget8">
    <h3 ng-click="onTitleClick()">Multi-language dashboards</h3>
    <div ng-show="columns.length == 0">No column was assigned.</div>
    <div ng-show="columns.length > 0">
        <div>Row count: {{rowCount}}</div>
        <table>
            <tr>
                <th ng-if="config.assignedColumns.numDataColumn">
                    {{config.assignedColumns.numDataColumn ? config.assignedColumns.numDataColumn.displayName : ""}}
                </th>
                <th ng-if="config.assignedColumns.textDataColumn">
                    {{config.assignedColumns.textDataColumn ? config.assignedColumns.textDataColumn.displayName : ""}}
                </th>
                <th ng-if="config.assignedColumns.dateDataColumn">
                    {{config.assignedColumns.dateDataColumn ? config.assignedColumns.dateDataColumn.displayName : ""}}
                </th>
            </tr>
            <tr ng-repeat="row in rows"
                class="rowEntry"
                ng-click="onRowClick(row)"
                ng-mouseover="onMouseOver(row)"
                ng-class="{'selected' : selectedRow === row}"
                ng-style="{'background-color' : getRowColor($index, row)}"
                >
                <td ng-repeat="column in columns">
                    <!--Date row-->
                    <span ng-if="column.type==='DATE'">
                        {{formatDateService.formatDate(row.values[column.idx], configuredColumns[column.name].format)}}
                    </span>
                    <!--Numeric row-->
                    <span ng-if="column.type==='NUMERIC'">
                        {{formatNumberService.formatNumberWithPattern(row.values[column.idx], configuredColumns[column.name].format, configuredColumns[column.name].round)}}
                    </span>
                    <!--Text row-->
                    <span ng-if="column.type==='TEXT'">
                        {{row.values[column.idx]}}
                    </span>
                </td>
            </tr>
        </table>
    </div>
</div>
Explanation:
The implemention in line #9, #12 and #15 uses the new config property “keys” returned from getTranslationKeys and the design language values use the “values” returned from the getTranslationKeys function.
Read in this series:
- (0) Custom widgets introduction and prerequisites
- (1) Creating a simple custom widget
- (2) Setting up data assignment
- (3) Configuration of assigned columns
- (4) Configuration of thresholds
- (5) Selection handling
- (5a) Multiple selection handling
- (6) Using filters
- (7) Creating actions
- (8) Enable multi-language support
- (9) Using the D3 library within a custom widget