Table of Contents [-]
Duration: 25 minutes
This tutorial demonstrates the power and convenience of using Flow, a simple drag-and-drop language for service development. In this tutorial you will create a service that maps requests to responses, use a LOOP operation to process a data array, and add logic to transform the data from one format to another prior to output.
Note: The LOOP operation is analogous to a “for-loop” statement in languages such as Java.
Prerequisites #
This tutorial builds on concepts, techniques, and objects covered previously in:
- 1. Create an IS Package and Folders
- 2. Create and Run a Flow Service
- 3. Create Document Types
- The tutorials above must be completed or you can import the solution: Completed Export of 3. Create Document Types.zip using these instructions: Import an IS Package
- The IS must be started. Instructions on how to start the IS are found in the Prerequisites part of the 1. Create an IS Package and Folders. Create an IS Package and Folders]] FLOW tutorial.
Step Outline #
You create the services by:
- Creating a Flow service that maps requests to responses
- Adding and configuring the MAP and LOOP operations
- Adding transformation logic
- Importing a data file as input to the service
Step 1: Create a Flow Service to Map Requests to Responses #
In this step: You create a Flow service that maps requests to responses.
To create the Flow service:
- Right-click on the FLOW_Tutorial.services folder and select New > Flow Service
Designer prompts you for a name.
- Name the new service OrderRequestToOrderResponse and click Finish:

Designer displays the new service in the Package Navigator view, and opens the service in the Flow Editor in the top center panel of Designer.
- Select the Input/Output tab at the bottom of the Flow Editor view
 |
- Expand the Palette to the right of the Flow Editor view’s Input/Output tab (or use one of the alternate methods described in the previous tutorial) to add a Document Reference to the left (input) side of the service signature
 |
Designer displays the Select… dialog:

- Click to expand the FLOW_Tutorial -> docs folder, select the OrderRequest Document Type, and click OK:

Designer creates the new document reference in the Input/Output tab:
 |
- Name the document Request:
 |
- Add a Document Reference output to the service
- In the same way that you added the OrderRequest Document Reference to the input of the service, add a Document Reference to FLOW_Tutorial.docs:OrderResponseto the service output, and name it Response
 |
You have now defined the input and output for the OrderRequestToOrderResponse service. You can expand the Request and Response nodes to display their structure, which was created by referencing the document types that you created previously:
 |
Step 2: Add Map and Loop Steps to the Service #
In this Step: You will add two MAP steps and LOOP a step to the service.
To add a MAP step:
- Select the Tree tab at the bottom of the Flow Editor, and expand the Palette to the right of the editor.
The editor functions, including the MAP and LOOP tools are now available:
 |
- Add the following steps to the service, in order:
a MAP
a LOOP
another MAP as a child of the LOOP
another MAP but not as a child of the LOOP
 |
- Select the Pipeline tab in the bottom panel
The Pipeline In and Pipeline Out panels of the Pipeline view, show the objects Request/Request/Orders and Response/Response/Orders as Document Lists:
 |
You can now set the LOOP Input array and Output array properties of the LOOP step.
To set the Input array property of the LOOP to Request/Request/Orders:
- Select the LOOP step in the flow editor
Designer displays the LOOP Properties:
 |
- Select the last MAP in the service and copy the array element Request/Request/Orders from the Pipeline view:
 |
- Select the LOOP again to display the LOOP Properties
- Paste Request/Request/Orders directly into the Input array field:
 |
Best Practice: Copying and pasting reduces the chance of typing errors, especially when dealing with very complex structures and long names.
- Follow the same process to set the LOOP Output array property to Response/Response/Orders:
 |
If you select the Map step under the LOOP step and view the Pipeline Editor, you will notice that the Pipeline In and Pipeline Out now shows Request/Request/Orders and Response/Response/Orders as single Documents instead of Document Lists:
 |
You may now safely map data within the LOOP.
Step 3: Map Data within the LOOP #
In this step: You will map data within the LOOP.
To map the data:
- select the nested MAP step:
 |
- Link the following elements of the MAP step in the Pipeline tab:
Pipeline In: Request/Request/Orders/OrderID to: Pipeline Out: Response/Response/Orders/OrderID
Pipeline In: Request/Request/Orders/UnitPrice to: Pipeline Out: Response/Response/Orders/AmountDue
 |
Note: You can map elements by:
- Selecting the source element, then dragging and dropping it at the destination element
or by:
- Selecting the source and selecting the destination elements, then clicking the Link () button

- Select the last MAP in the service and link the Sender data as follows:
Pipeline In: Request/Request/Sender to: Pipeline Out: Response/Response/Customer
 |
-
Saveyour new OrderRequestToOrderResponse service

You can now run the service and load a file as input to the service.
Step 4: Run the Service with Data from an Input File #
In this step: You will run the service and input data by loading an XML file.
To load the input file and run the service:
- Select the OrderRequestToOrderResponse editor tab (), pull down the Run (
 ) menu from the Designer toolbar and choose to Run As -> Run Flow Service
 |
Designer displays the Input dialog.
- Select Load… button
 |
Designer displays the Open explorer dialog.
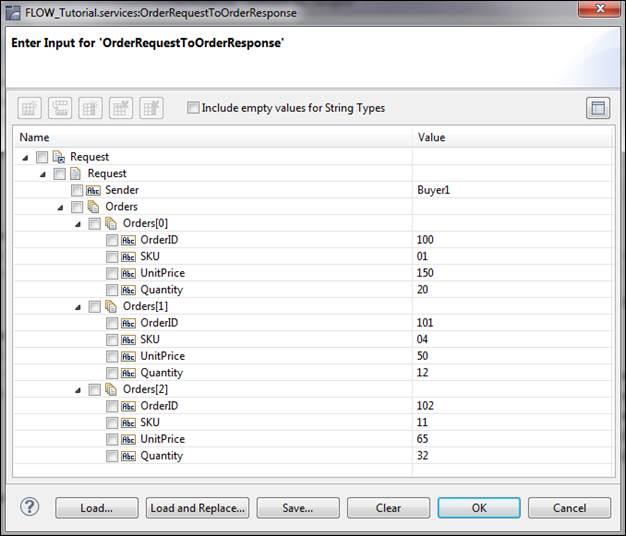
- Download and select the file: FLOW_Tutorial_4_Input.xml and click Open
Designer displays the data loaded from the input file. The input file contains the following Orders:

| Sender | Buyer1 | |||
|---|---|---|---|---|
| Orders | OrderID | SKU | UnitPrice | Quantity |
| 100 | 01 | 150 | 20 | |
| 101 | 04 | 50 | 12 | |
| 102 | 11 | 65 | 32 |
- Select OK. Designer runs the service and displays the Results tab:

You can verify that the input file data is mapped correctly by comparing the values in the Input dialog to those in the Results pane.
Step 5: Add Transformation Logic to the Data Mapping #
Flow provides Transformers that enable you to quickly and easily implement data transformations. Transformers are lightweight service invocations that can be consolidated into a single MAP step.
In this step: You will insert a Transformer into the MAP step to transform data as it is being processed by the service.
Note: You need to delete the link between UnitPrice and AmountDue before you add the Transformer.
To delete the data mapping into Response/Response/Orders/AmountDue on the nested MAP step:
- Select the MAP step, then select the Pipeline tab:
 |
- Select the link between the UnitPrice and AmountDue elements, and click the Delete Pipeline View toolbar button:

 |
You can now add a Transformer to the service.
To add the transformer pub.math:multiplyInts:
- From the Pipeline view toolbar, click the arrow down part of the Transformer menu select pub.math, then select multiplyInts:

 |
Designer adds the pub.math:multiplyInts Transformer to the Pipeline.
 |
- Expand the Transformer, then map the following inputs:
Request/Request/Orders/UnitPrice to: num1 of the transformer Service In
Request/Request/Orders/ Quantity to: num2 of the transformer Service In
- Map the Transformer Service Out value variable to: Response/Response/Orders/AmountDue
 |
- Collapse the Transformer to review the service mapping:
 |
To add the transformer pub.string:toUpper to the final MAP step:
- Select the final MAP step, and delete the link between Request/Request/Sender and Response/Response/Customer
- add the Transformer pub.string:toUpper to the final MAP step, and map the input and output as follows:
Request/Request/Sender to: inString
- map the output as follows:
value to: Response/Response/Customer
 |
Select the Save button. You can now run the service again.
- Select Run from the Designer toolbar:
Designer displays the data loaded from the input file:
| Sender | Buyer1 | |||
|---|---|---|---|---|
| Orders | OrderID | SKU | UnitPrice | Quantity |
| 100 | 01 | 150 | 20 | |
| 101 | 04 | 50 | 12 | |
| 102 | 11 | 65 | 32 |
- Select OK
Designer runs the service and displays the Results tab:

Conclusion #
You have created a typical Flow service that maps one data structure to another, loops over arrays, and performs simple data transformation.
Note: You can also use the REPEAT function to perform operations similar to LOOP. If you are familiar with Java, you can think of a REPEAT as a “while loop”.
To import the solution of this tutorial download Completed Export of 4. Create a LOOP Operation.zip and follow the directions in the Import an IS Package tutorial.
Read in this series:
- webMethods Flow Tutorial - No.1 Create an IS Package and Folders
-
webMethods Flow Tutorial - No.2 Create and Run a Flow Service
-
webMethods Flow Tutorial - No.3 Create Document Types
- webMethods Flow Tutorial - No.4 Create a LOOP Operation - Current tutorial
-
webMethods Flow Tutorial - No.5 Create a BRANCH Operation
- webMethods Flow Tutorial - No.6 Create a SEQUENCE Operation
- Import an IS Package
-
File Drop Tutorial
- Flat File Processing Tutorial
-
webMethods JDBC Adapter tutorial - Create a JDBC Adapter Service
-
webMethods SAP Adapter Tutorial
- Integrate with Salesforce.com using the CloudStreams Adapter