How to install a Microfrontend Plugin on my tenant?
With the release of version 1016 of the WebSDK, you can officially install Microfrontend plugins on your tenant. For older tenants (starting with 1013) it is possible too. While there is a comprehensive guide around the whole plugin concept already available, we want to focus here just on the part how to install and activate plugins on a tenant.
How to know that the repository contains a plugin?

Usually repositories containing plugins will state that either in their name, readme file, or have tags pointing out that this repository contains features in a plugin format. If you are not sure, then checkout the package.json file of the project. If the c8y configuration there contains a "package": "plugin" definition, you can be pretty sure that the project in front of you contains a plugin.

I found a plugin repo. How do I get the plugin installed?
Our open-source projects sometimes can differ a bit. While it is always recommended to create downloadable release packages, not all projects offer that. In case the project contains an already packaged zip file, you can directly jump to b). If no zip files are offered, then let’s create and deploy the projects plugin on our own!
a) No release package found? - Build and upload the plugin on your own!
Let’s build 

If you already have the zip file, then just skip this and go ahead with the deployment. Otherwise makes sure to have node.js version 14 installed and install the c8ycli.
Then download the code of the project, open a terminal an cd into the project, so that you are on the level where the package.json is located. Then run npm i which will install all the dependencies that the project needs. After that create a build by running c8ycli build.
Upload to the tenant using c8ycli
If the build was successful, you can then either go into the directory of the created dist folder and zip and upload the file manually, or keep it simple and just use the c8ycli again to deploy via command line too. Just run c8ycli deploy -u https://your.target.tenant.com.
Once run, you need to provide your credentials with which you login on the tenant (and you need appropriate rights to create a new app on the tenant you are targeting). If the deployment was successful, it means that the plugin was successfully uploaded and installed!
b) Download zip from the repository and upload it to the tenant
If you have the opportunity to download a zipped release of a plugin then you can just go to your tenant and open the Administration app. Once opened, go to Ecosystem > Applications. In the tabs you should see All Applications, Packages, Features.
![]() If you do not see the Packages tab, that means that your tenant uses an older version of the Administration application than 1016. If that is the case, simply add beta=true before the # in the url, e.g. https://your.tenant.com/apps/administration/index.html?beta=true#/ecosystem/package-list.
If you do not see the Packages tab, that means that your tenant uses an older version of the Administration application than 1016. If that is the case, simply add beta=true before the # in the url, e.g. https://your.tenant.com/apps/administration/index.html?beta=true#/ecosystem/package-list.
You should see the following screen:
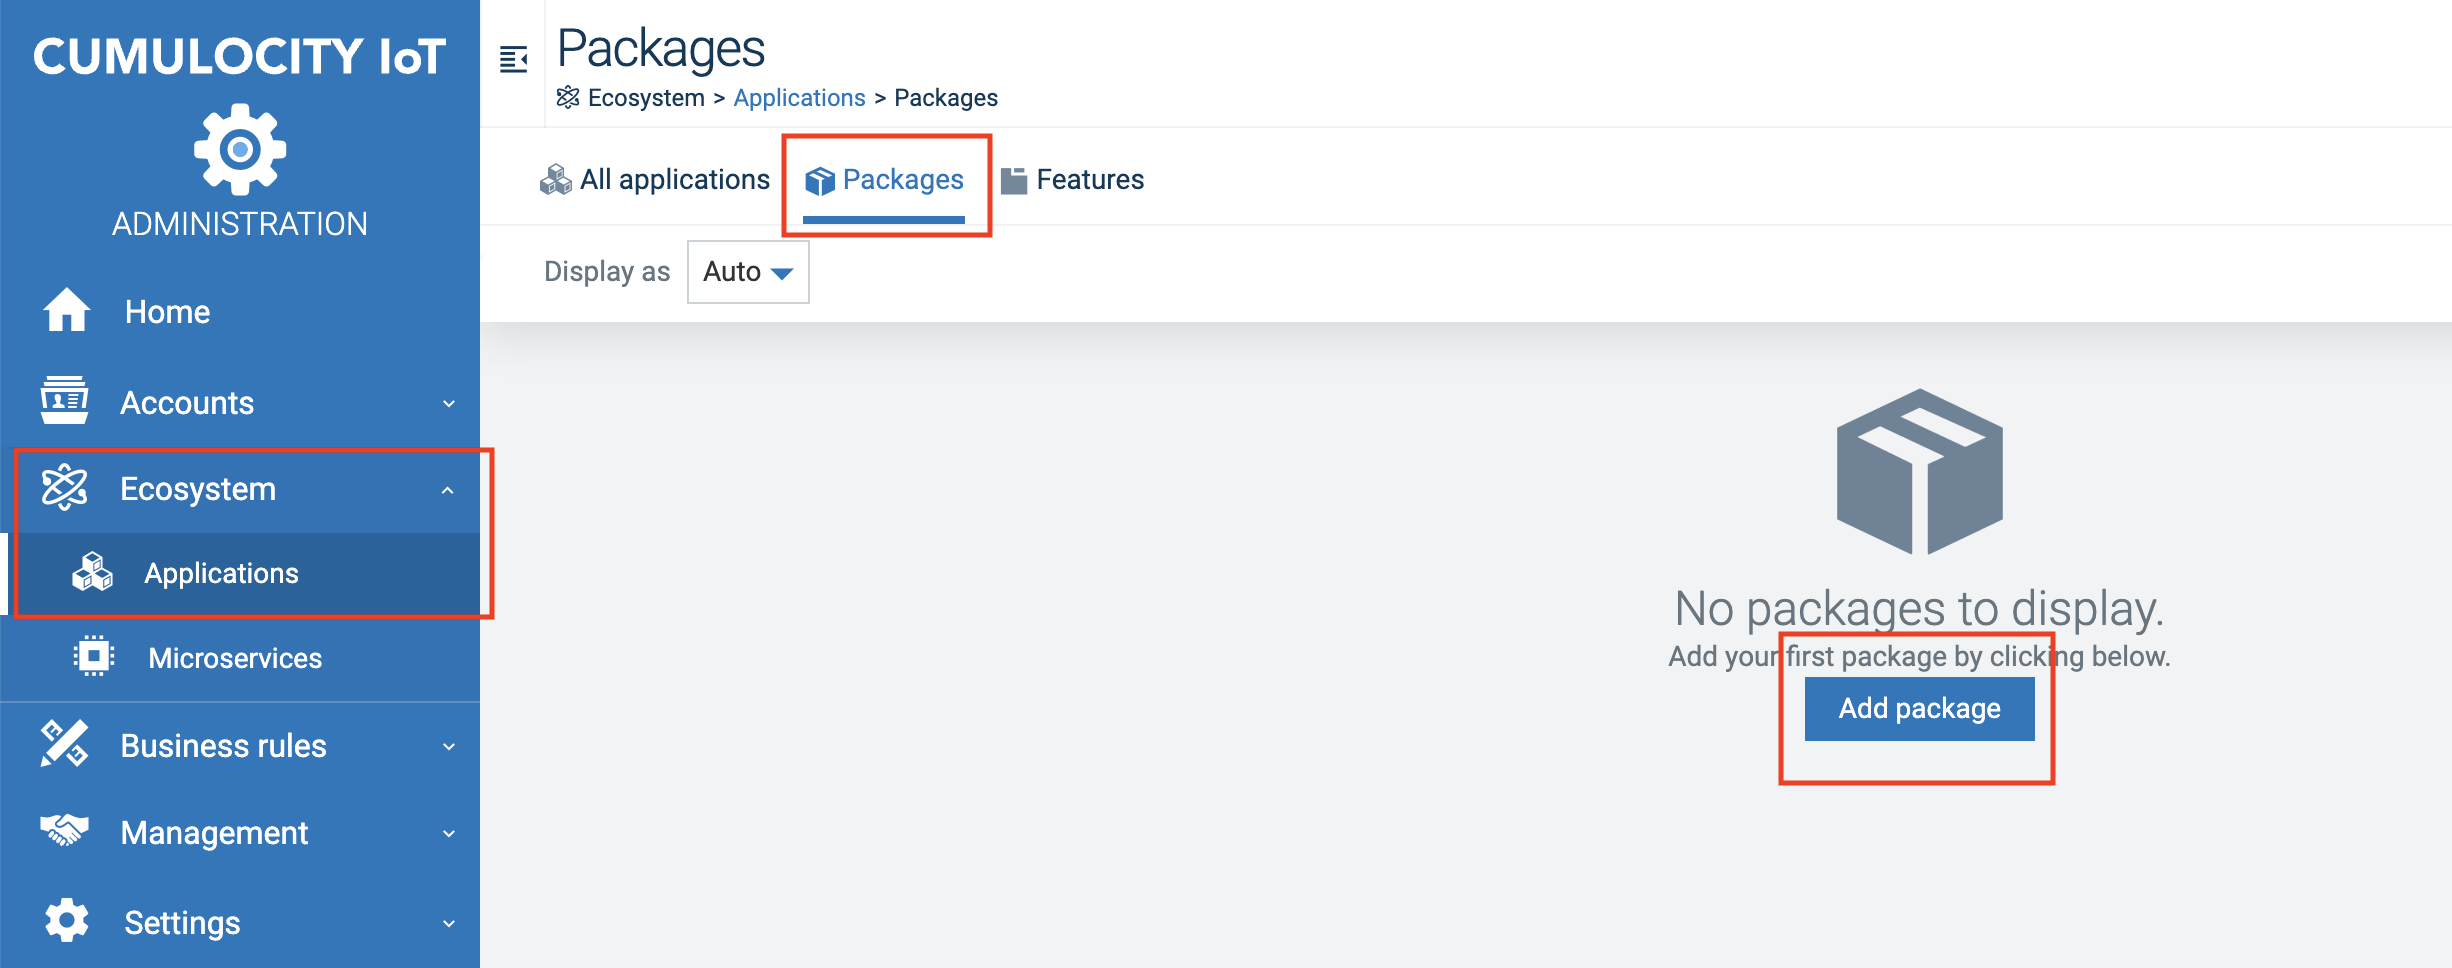
There just click on add package and upload your zipped plugin.
How to use the installed plugin on an app?
Congratulations! You just successfully added your first plugin to the tenant! ![]()
With the first milestone being done let’s now face the next step - we of course want to use the installed plugin on one of the apps.
Basically, it is now up to you for which app you want to install the plugin. You could either create clones of the Cockpit, Device-Management or Administration apps, or use it on already installed custom apps. But there is one thing you need to keep in mind:
![]() Check that the WebSDK versions match!
Check that the WebSDK versions match! ![]()
With version 1016 this part will be way easier, as plugins will get versioning. That way it is then clear that version 1 of a plugin will for example work with 1016 of the Cockpit clone and version 2 will work with version 1017 of the Cockpit clone.

If your tenant is using older versions of the WebSDK than 1016, this versioning feature will not yet be available and WebSDK versions between plugins and the target apps where you want to install these need to match fully (e.g. versions need to equal 1016.0.59). From version 1016, the compatibility is more forgiving - there just the major version needs to match (e.g. 1016).
If the versions do not match, you can prevent compatibility issues by just quickly generating clones with the correct version like this:
Create, build and upload Cockpit, Administration or Device Management clones with the same version as the plugin
First of all, check the version that the plugin uses. Open the package.json and search for “@c8y/…” prefixed dependencies. Copy the version of these dependencies.

We now want to create a clone of the app that shall use this plugin where the WebSDK version will be exactly the same. Open a command prompt and type c8ycli new. The terminal now wants you to provide a name. If you want to create a clone that overrides the subscribed standard apps, pick either:
- cockpit,
- devicemanagement, or
- administration.
After that, the WebSDK version can be picked. Select other and paste the version that you copied before from the package.json of the plugin:
After that, select the app you want to clone, in this example it would be cockpit. After that, a new clone will be created locally on your computer. Wait until the script finishes, then cd into the app and run npm i. After the installation of the dependencies, just do the same build steps as in the chapter before - run c8ycli build and after that c8ycli deploy -u https://your.tenant.com/.
Done! You uploaded a clone of an app that exactly matches the version of the plugin! ![]()
Install the plugin on an app
The moment is finally there! You are seconds away before opening up a new world of adding new content to your apps with the simple click of a mouse.

Open the administration app again (with the beta=true flag if WebSDK version is below 1016).
Click on the All applications tab and click the app you want to extend. In my example I will extend an Administration clone:
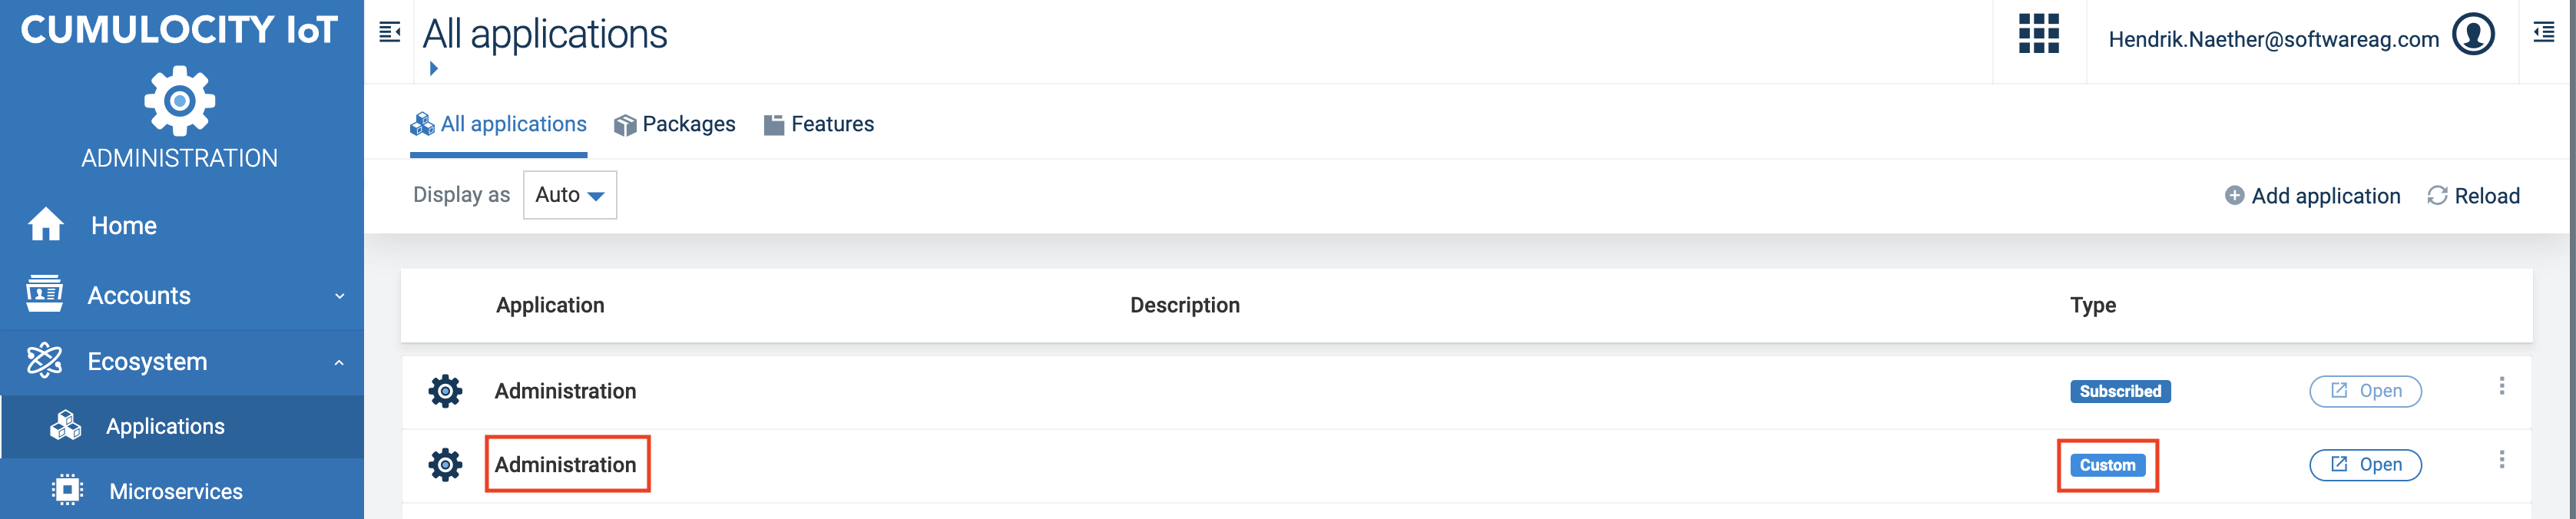
Clicking on my custom Administration app will open the Properties tab of that application. A second tab is available - the Plugins tab. Click on that and you will see an empty list of Installed Plugins on the right. It’s simply empty as no plugin has been installed for that app yet. We change that now by clicking on Install plugins.

This will open up a modal showing the compatible plugins for your app. If you have followed the previous steps about creating a clone with a matching version, there should be no issues now and you should see the plugin that you installed in the first chapter.
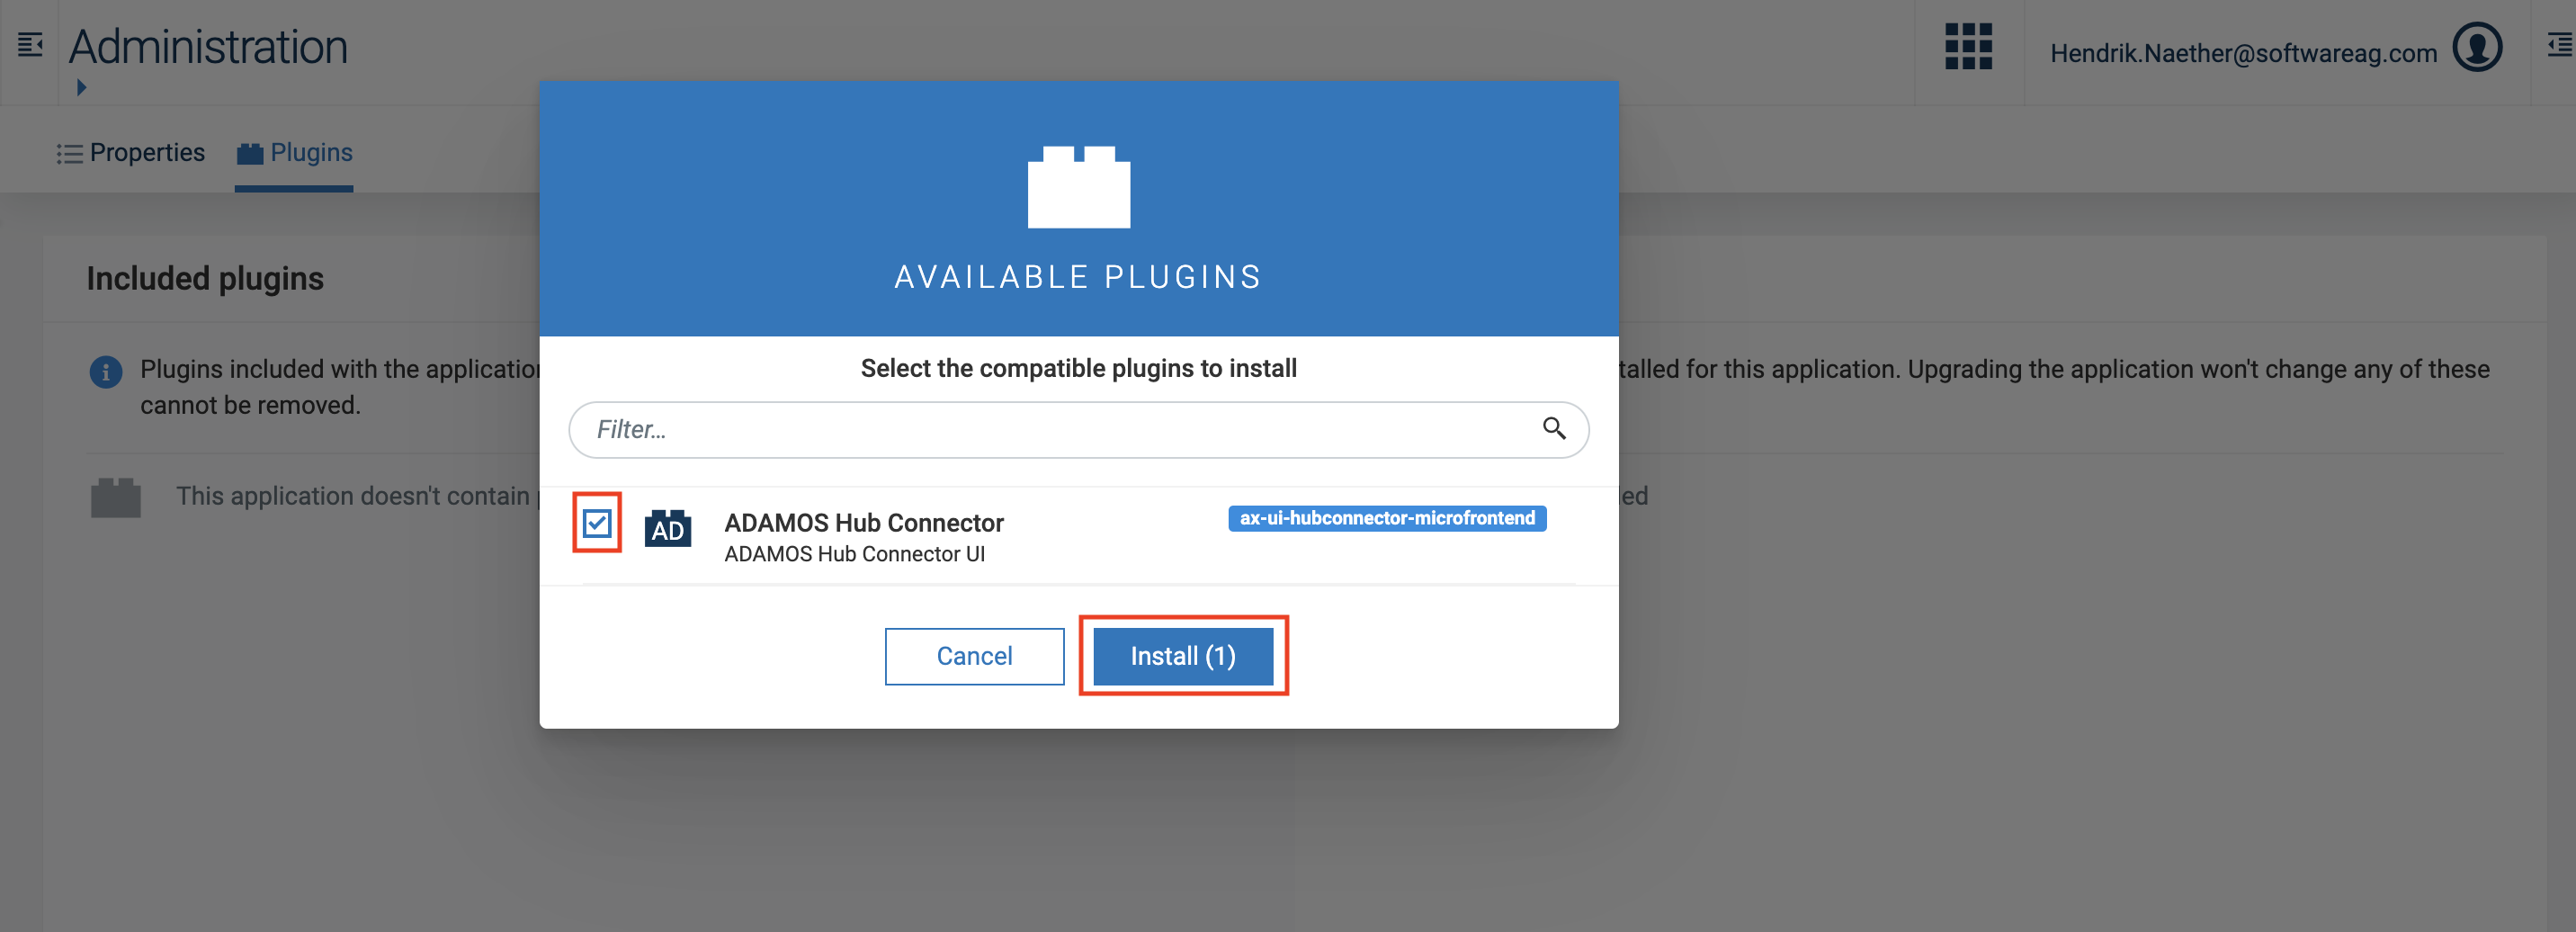
Select your plugin and click Install. That’s it! Your app now uses the plugin!

I knew you could do it!