Overview
webMethods developer portal is simplified and lean architecture that is easier to run and requires less resources
It is headless, pluggable, and extensible in nature. There’s an API for everything, customers will be able to use the Developer Portal or build their own UI for different type of asset.
The developer portal is event-enabled.Anything that happens in the product emits an event which other solutions can subscribe to.
You can connect the Developer Portal with gateways from other vendors, or you can publish third-party APIs
Let us consider the use case of integration with 3rd party gateways. APIs from different gateways can be exported and imported into the developer portal. Both external and internal consumers can then consume the APIs. We can also have an optional integration layer to automate the configurations required on the gateway side to establish the connectivity with developer portal.
Azure Gateway Set Up
-
Create API Management Service in your azure account with proper resource group and name.

-
Once the API management service is create successfully. Create an API by clicking on the Add API.
-
Once the API is created enable the subscription key and OAuth2.0 in the settings tab.
-
Export the API by clicking on the 3 dots near the API name and choose the format in which you want to export the API.


Developer Portal Set Up
-
Import the API exported from Azure in Developer portal by using the Manage APIs option.

-
Import the file to create the API in developer portal.

Once the API is created successfully the API should be tagged to a correct API provider. -
3rd Party Gateway providers should be configured as a provider in developer portal. Click on Manage providers.
-
Enter the provider details such as the provider name and select the callback url.


Callback url will contain the end point detail to which the events will be published when consumer take any action in developer portal.
Tag the newly imported API to the provider by clicking on Add below the APIs label.
-
Callbacks URL are configured as webhooks in developer portal. Click on Administration and webhooks tab. Enter the URL, select the type as Provider, security and event type and choose all the Gateway application event type.
-
Go to the API and click on the Try API tab to test the API. Click on the create new application option. Enter an unique name for application, description and callback url is optional. If you have configured the callback url at the provider level you can ignore this field.

-
Once the application request is submitted the event will be published to the callback url. Integration logic should be written to create the subscription for this application at the Azure end. This integration logic is covered in the next section.
-
After the application is created the user will be notified in the notification section in developer portal.

-
You will be able to see the application details in the Manage applications section.

-
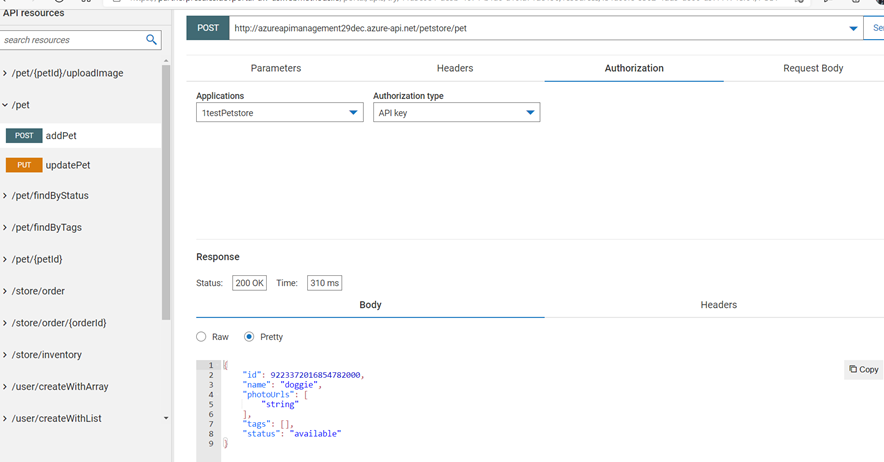
Now you can test the API using the application that was created recently.

Integration Logic
Below mentioned integration logic needs to be built and any integration platform can be used to build the logic. We have used Webmethods.io
Sequence of events will be:
- Create a webhook and this url is the one which will be configured in developer portal. When an application is created in developer portal and an event will be published. Check for the event type and it will be REQUEST_ACCESS_TOKEN

The application creation event will be INPROGRESS state until its updated back using a custom logic. In our case we will update after the subscription is completed in Azure gateway.

-
To enable the REST API access in Azure API Management the Enable Management REST API should be enabled in Management API tab in Azure.

-
You need to get an authorization code from azure to make REST API calls. The below API can be used to get the bearer token.

The response of the API call will give you the access token. This token can be used to make further calls.
-
Next step is to create application in Azure which can be subscription to a API or subscription to a product(group of API’s). We will create a subscription for an API using the below rest API.
-
You primaryKey/secondaryKey will be the subscription key for the API that needs sent while testing the API. Incase if the API is OAuth enabled then the client Id and client secret along with the redirection URL needs to be updated in Developer Portal.
-
The event will be in progress state in developer portal so we will update the event first in developer portal using the eventId that’s highlighted in step1 using the below rest API.

**Sample Request:**
**POST**: **https://xxxx/portal/abs/apirepository/v1/accesstokens/?eventId=eventId**

Basic Authentication
{
    "name": "Application name",
    "owner": "Owner ID",
    "documentType": "APPLICATION",
    "providerRef": "Provider reference ID",
	"access": {
		"teams": [],
		"users": []
	},
	"apis": [
		"API ID can be retrieved from the event in step1"
	],
	"credentials": [
		{
			"expiry": null,
			"apiKey": "primaryKey/secondaryKey from step 4",
			"type": "APIKey"
		},
		{
			"clientId": "clientId",
			"clientSecret": "clientSecret",
			"scopes": [],
			"tokenLifeTime": 3600,
			"tokenRefreshLimit": 0,
			"authorizationUris": [
				"https://login.microsoftonline.com/xxx/oauth2/authorize"
			],
			"accessTokenUris": [
				"https://login.microsoftonline.com/xxx/oauth2/token"
			],
			"redirectUris": [
				 "https://xxxx/portal/rest/v1/oauth/callback"
			],
			"refreshTokenUris": [],
			"type": "OAuth2"
		}
	],
	"status": "LIVE",
	"slots": {
		"$stage": "lean portal"
	},
	"deleted": false,
	"app_type": "API"
}

Sample Response:
{
    "message": "Application created successfully",
    "accessTokenUuid": "a692fd03-af30-4120-8ea4-a9b86ea67e9f",
    "status": "SUCCESS"
}
- Once the event is completed we have to update the application that’s created in developer portal with the appropriate client credentials that’s generated in Azure end. The event will have the applicationId(accessTokenUuid) in the response. You that id and with the same request as in step 6 update the application details using the below API.
**PUT: https://xxxxx/portal/rest/v1/applications/applicationId**

Basic Authentication

Sample Request:

{
	"name": "Application name",
    "owner": "Owner ID",
    "documentType": "APPLICATION",
    "providerRef": "Provider reference ID",
	"access": {
		"teams": [],
		"users": []
	},
	"apis": [
		"API ID can be retrieved from the event in step1"
	],
	"credentials": [
		{
			"expiry": null,
			"apiKey": "primaryKey/secondaryKey from step 4",
			"type": "APIKey"
		},
		{
			"clientId": "clientId",
			"clientSecret": "clientSecret",
			"scopes": [],
			"tokenLifeTime": 3600,
			"tokenRefreshLimit": 0,
			"authorizationUris": [
				"https://login.microsoftonline.com/xxx/oauth2/authorize"
			],
			"accessTokenUris": [
				"https://login.microsoftonline.com/xxx/oauth2/token"
			],
			"redirectUris": [
				 "https://xxxx.webmethods.io/portal/rest/v1/oauth/callback"
			],
			"refreshTokenUris": [],
			"type": "OAuth2"
		}
	],
	"status": "LIVE",
	"slots": {
		"$stage": "lean portal"
	},
	"deleted": false,
	"app_type": "API"
}
- Step number 6 and 7 will be the same regardless of whatever backend API gateway provider is. The logic of creating the subscription at gateway end and retrieving the credentials will vary based on the API gateway provider.