Introduction
This article defines steps to configure Ping Identity as Identity Provider (IdP) for Software AG Cloud. Ping Identity software provides federated identity management and intelligent access so users can connect securely to the cloud, mobile, and on-premises applications.
Setting up SSO in the Software AG Cloud (SAG Cloud) with Ping Identity as the IDP is a process that requires some setup in both environments. It requires information from both environments, so it makes sense to open two browser windows from the start in order to follow the process.
The process involves the following steps:
- Manage Group membership
- Setting up Ping Identity as Identity Provider for Software AG Cloud
- Configuring Ping Identity Single Sign-On Integration with SAML
Pre-requisites
- You require a SAG Cloud tenant and a user with admin access to the tenant.
- You require an active Ping Identity account.
Manage Group membership
Group information is sent in the SAML assertion when the user signs in to a target app. In this part of our documentation, we will be creating a new group SAG_WMIO_USERS and assign our existing user to this group though we can use any existing group also.
-
To add a group, from the main menu select Connections > Identities > Groups.
-
From the Groups page, select the + (plus) sign.

The Create New Group page appears -
In Group Name and description field enter your group name (for us in this example it will be SAG_WMIO_USERS) and its description and click Save.

-
To add users to this group, click on Users tab on group details page and click Add Individually
-
Select users which you want to be part of this group and click Save.
-
This group will be assigned to our saml application when assigning access further down is this example.


Setting up Ping Identity as Identity Provider for Software AG Cloud**
-
Open two tabs in your browser and login to Software AG Cloud account in one of them.
-
Go to Administration.
-
Click SingleSignOn and Add identity provider. The Add identity provider wizard
appears. -
Enter your identity provider display name and unique identifier details in the Identity provider
display name and Identity provider identifier for use in Software AG Cloud redirect URI
fields. (Here we have taken pingIdentity as display name and unique identifier name)
-
Copy or make a note of the value displayed in the Software AG Cloud redirect URI field.
This value is used when configuring Service Provider for Ping Identity.

-
In second tab login to your Ping Identity account.
-
To setup of Software AG Cloud as new SAML application, select Connections > Applications from the Main menu.
-
From the Applications page, select the + (plus) sign.
The Add Application wizard appears. -
Enter the SAML application name (here we have taken Software AG Cloud as the application
name).

-
Click the SAML Application option.

-
Select Configure when available after selecting the SAML Application. The SAML
Configuration wizard appears. -
Select the Manually Enter option.
-
Enter Software AG Cloud redirect URI copied in step 5 in ACS URLs and Entity ID.
The ACS URL format is,
{{Hostname}}/auth/realms/{{realm_name}}/broker/{{identityprovider_name}}/endpoint
The Entity ID format is,
{{Hostname}}/auth/realms/{{realm_name}} -
Click Save.


You added the application to your Ping Identity account. You need to configure the application
to enable the Single Sign-On
- You should be redirected on Application overview page in you Ping Identity account.
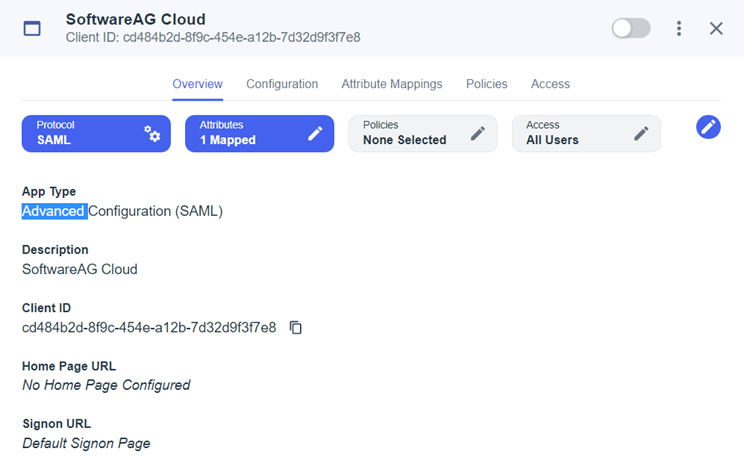
Configure Ping Identity Single Sign-On Integration with SAML**
-
Enable Software AG Cloud by turning on the toggle button.
-
In the Attribute Mappings tab, click Edit (the pencil icon). The Edit Attribute
Mappings page appears. -
Add the mappings between Ping identity and saml by clicking +Add for each entry:
-
Click Save. You are redirected to the Software AG Cloud page.
-
In the Access tab, click Edit (the pencil icon). The Edit Access page appers.
-
Select the groups applicable for this application under the Group Membership Policy.
-
Click Save. You are redirected to the Software AG Cloud page.
-
In the Configuration tab, click copy IDP Metadata URL.
-
Switch back to Software AG Cloud application tab on your browser and paste it in URL text
box within Import configuration from URL option and click Next. -
In the Configuration tab, keep settings as default and click Next.
-
In the Attributes tab, create mapping between Ping Identity’s SAML attributes and Software
AG Cloud attributes and click Next.
-
In the Roles tab, assign either a default Software AG Cloud role to user or assign Software AG
Cloud role to user by mapping to identity provider role.
-
Click Save. The Identity Provider configuration is saved.
-
Logout and login again using Ping Identity as identity provider.


