Introduction
Setting up SSO in the Software AG Cloud (SAG Cloud) with PingFederate as the Identity Provider (IdP) is a process that requires some setup in both environments. It requires information from both environments, so it makes sense to open two browser windows from the beginning to follow the process.
The documentation related to the topic at hand is scattered across sites (PingFederate and Software AG) and some information is seemingly mentioned only in passing without concrete examples - something that can lead one to misconfigure it and then must spend time researching and fixing it.
With this short article, I am hoping to condense all relevant information in one location. This article is meant to provide a cheat sheet but does not replace the official documentation in any way.
The process described here has been certified with the PingOne as an Identity store. The process involves the following steps:
- Add PingOne as Datastore in PingFederate.
- Add Password Credential Validators in PingFederate.
- Add and configure Identity Provider Adapter in PingFederate.
- Add and configure Software AG Cloud as Service Provider in PingFederate
- Downloading IdP Metadata file
- Importing IdP Metadata and configuring Software AG Cloud
Pre-requisites
-
You require a SAG Cloud tenant and a user with admin access to the tenant.
-
You require an active PingIdentity account.
-
You should have user identities setup in your PingIdentity account.
Basic Preparation before configuring Software AG Cloud and Ping Federate
-
Setup PingIdentity to manage group membership
- Login to your PingIdentity account
- To add a group, from the main menu select Connections > Identities > Groups.
- From the Groups page, select the + (plus) sign.

The Create New Group page appears - In Group Name and description field enter your group name (for us in this example it will be
SAG_WMIO_USERS) and its description and click Save.

- To add users to this group, click on Users tab on group details page and click Add
Individually
- Select users which you want to be part of this group and click Save.
-
Add PingFederate server in your PingIdentity account
1. Click on PingFederate in main menu and click Add Connection
2. In Create Connection Profile page enter Connection Name, Description and
Save and Continue
3. Copy the credential at safe place as this will be used while setting up PingFederate
-
Install and deploy PingFederate Server. The following link provides all the information you
need to deploy PingFederate. -
Setting up PingFederate. The following link provides all the information you need to set up
PingFederate.


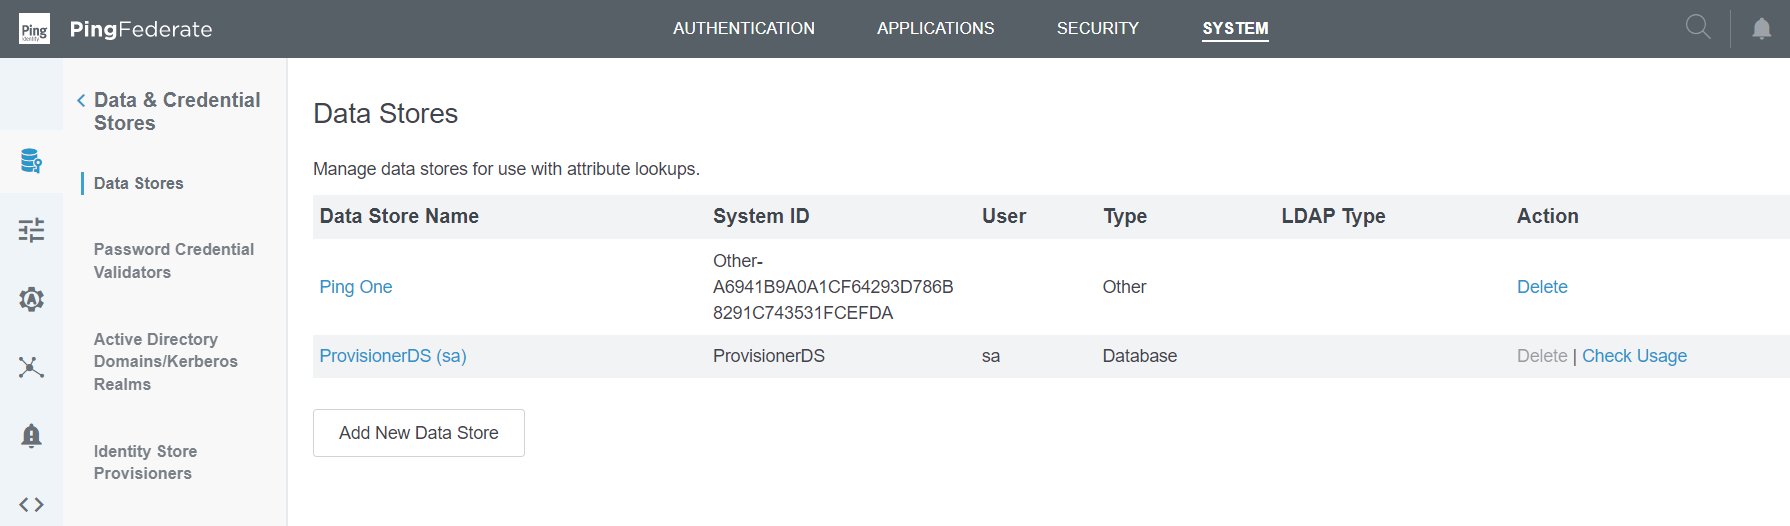
Add PingOne as Datastore in PingFederate.
-
Click System > External Systems
-
Click Add Connection and paste the PingOne credential copied in one of the above step
and click Save. -
Click System > DataStores in PingFederate home page
-
Click Add New Data Store
-
Enter Name as “PingOne” and select Type as “PingOne Data Store 2.4.1” and click Next
-
In Configure Data Store Instance select PINGONE ENVIRONMENT.
This should be the PingOne DataStore we configured above and click Next.
-
In Actions click Test Connection and test connection to your PingOne account and click
Next -
In Summary verify the details and click Save.


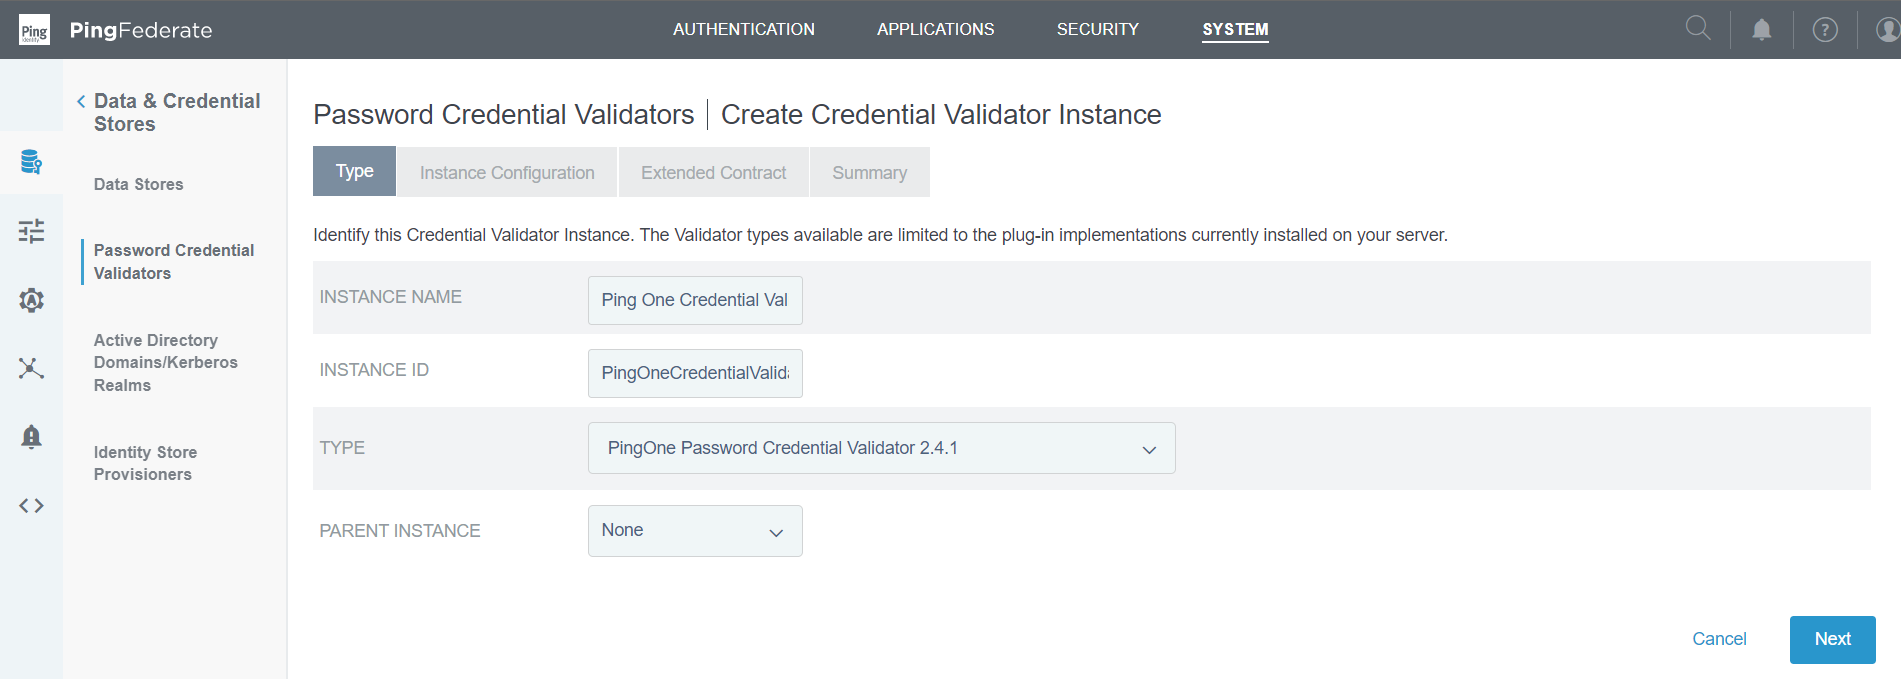
Add Password Credential Validators for your PingOne Data Store
-
Click Password Credential Validators and click Create New Instance
-
Enter INSTANCE NAME, INSTANCE ID and TYPE as shown below and click
Next.
-
In Instance Configuration select PINGONE DATASTORE. This should be the
DataStore setup above and click Next. -
In Extend Contract click Next.
-
In Summary verify the details and click Save.
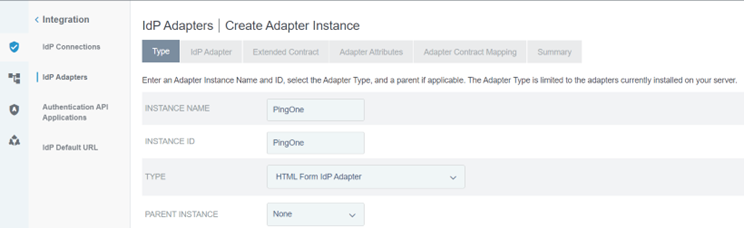
Add and configure IdP Adapter in PingFederate
-
Select Authentication > IdpAdapters
-
Select IdpAdapters and click Create New Instance.
-
Do the following in the Type tab:
a. Enter the Instance Name, Instance ID values.
b. Select HTML Form Idp Adapter in the Type drop-down list.
-
Click Next. The IdpAdapter page appears.
-
Do the following in the IdpAdapter tab:
a. Click Add a new row to 'Credential Validators and select one of the credential validator
step 2.
b. Click Update.
c. Leave other configurations as default. -
Click Next. The Extended Contract tab appears.
-
Add the additional attributes that must be retrieved from the configured user identity store.
-
Click Next. The Adapter Attributes tab appears, select the values that you want to use
in constructing this unique identifier and click Next.
-
In Adapter Contract Mapping tab click Next
-
The Summary tab appears.
-
Review the configurations set and click Save. The IdP Adapter is configured.


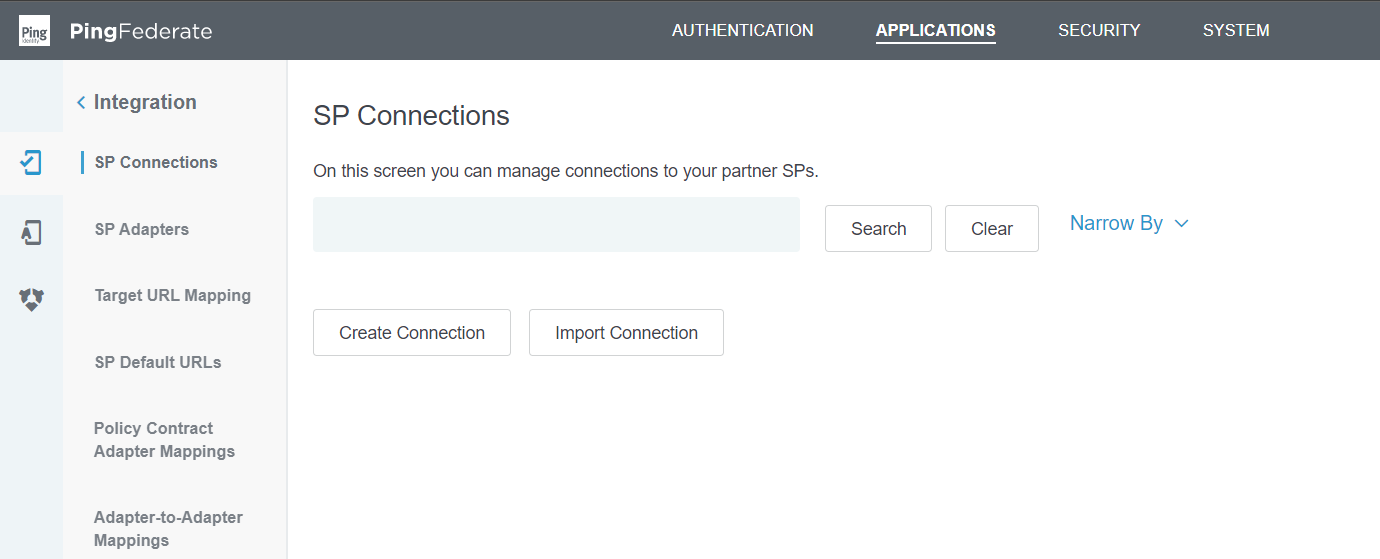
Add Service Provider configuration in PingFederate
-
Click Applications > SP Connections.
-
Select SP Connections from main menu and click Create Connection
-
In Connection Template keep setting as default (DO NOT USE A TEMPLATE FOR THIS CONNECTION) and click Next.
-
In Connection Type select BROWSER SSO PROFILES and click Next.
-
In Connection Options select BROWSER SSO and click Next.
-
In Import Metadata select File if you use Service Provider Metadata file. Otherwise, select None and click Next.
-
In General Info enter the EntityID and Connection Name information and click
Next.
The Entity ID format is,
{{Hostname}}/auth/realms/{{realm_name}} -
In Browser SSO click Configure Browser SSO and enter the browser SSO
configuration information.
-
In SAML Profiles select SP-INITIATED SSO and SP-INITIATED SLO and click
Next.
-
In Assertion Lifetime keep settings as default and click Next.
-
In Assertion Creation click Configure Assertion Creation and enter assertion creation
configuration.
-
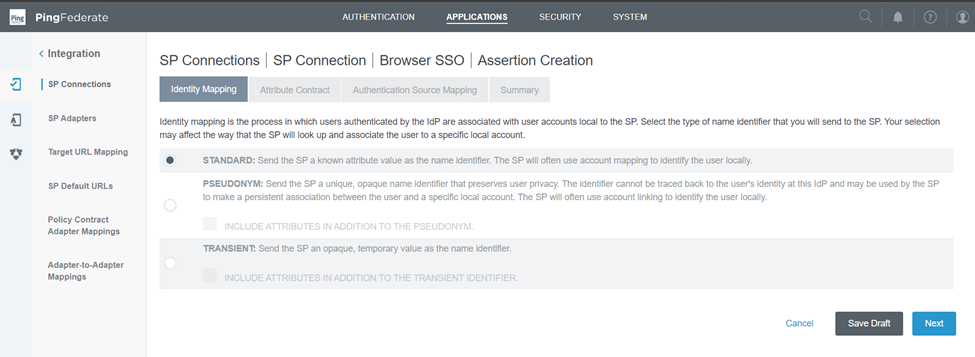
In Identity Mapping keep settings as default and click Next.
-
In Attribute Contract enter the set of user attributes that this server must send in the
assertion and click Next.
-
In Authentication Source Mapping map an adapter instance for each IDM system or an
authentication policy contract for each policy. -
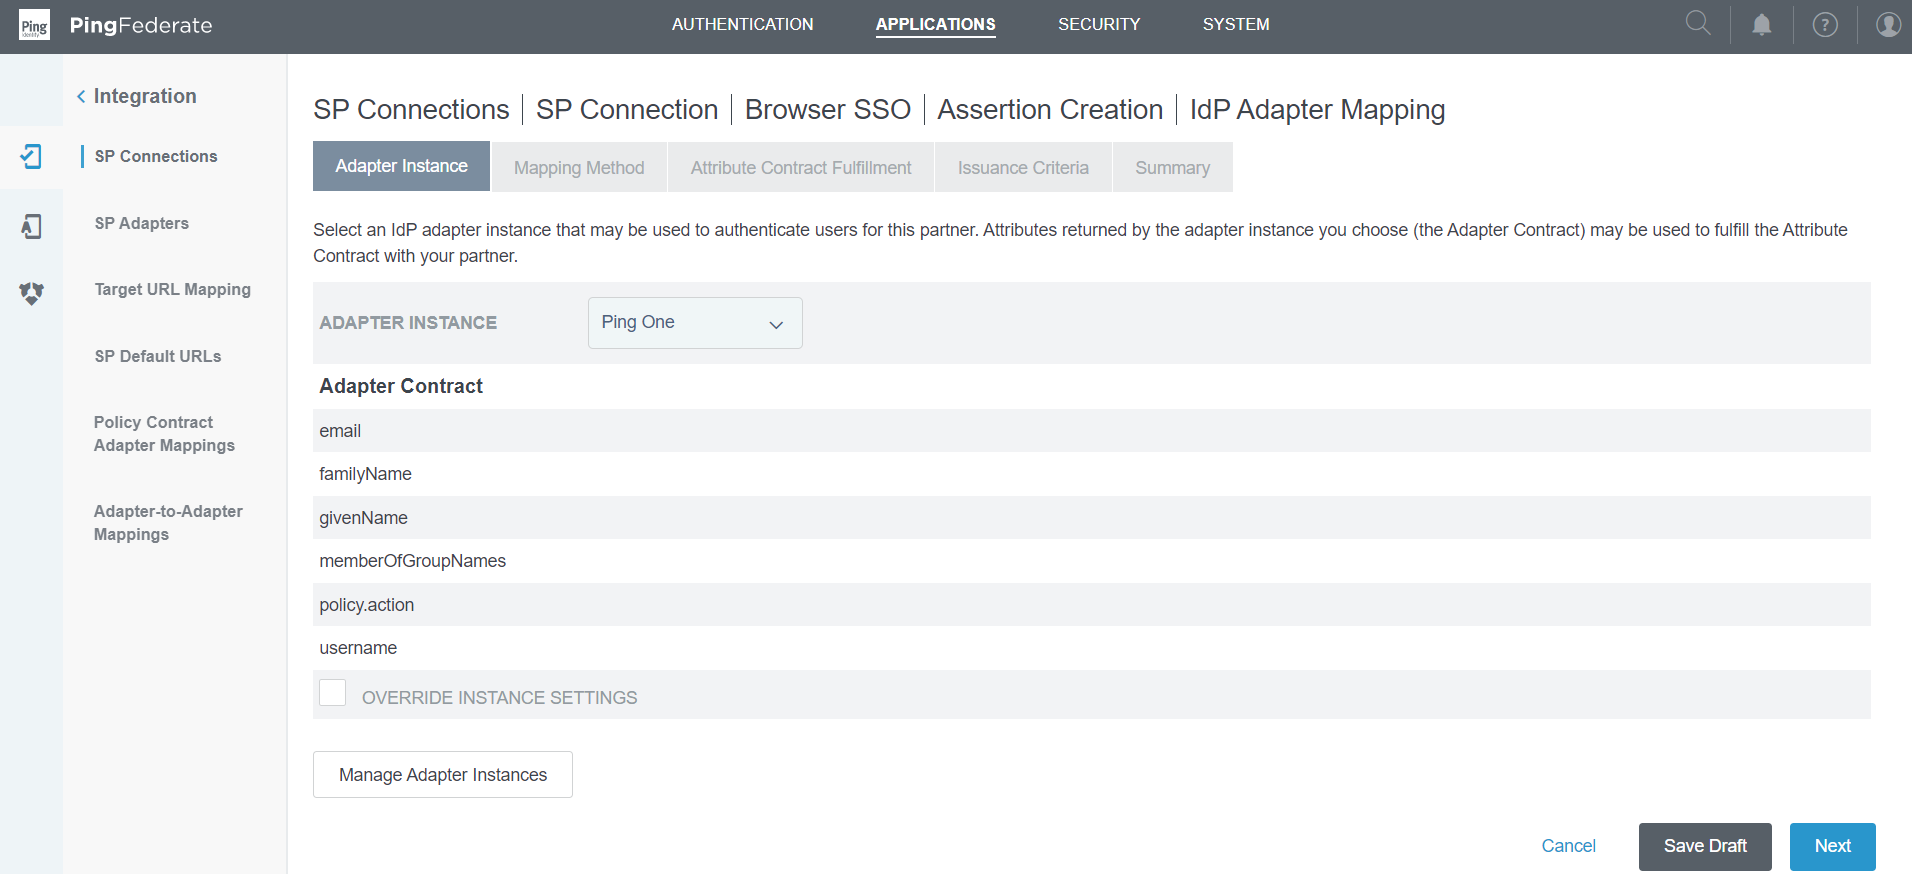
Click Map New Adapter Instance and enter Idp Adapter Mapping.
-
In Adapter Instance select an Idp Adapter configured in step Configure your Idp
Adapters and click Next.
-
In Mapping Method keep settings as default and click Next.
-
In Attribute Contract Fulfillment fulfill your Attribute Contract with values from the authentication adapter and click Next.
-
In Issuance Criteria click Next and verify the Idp Adapter Mapping configuration
summary, click Done. You are redirected to Assertion creation Configuration. -
Click Next and verify the configuration summary and click Done. You are redirected to
Browser SSO configuration and click Next. -
In Protocol Settings click Configure Protocol Settings and enter Protocol Settings
configuration.
-
In separate tab login to your Software AG Cloud account.
-
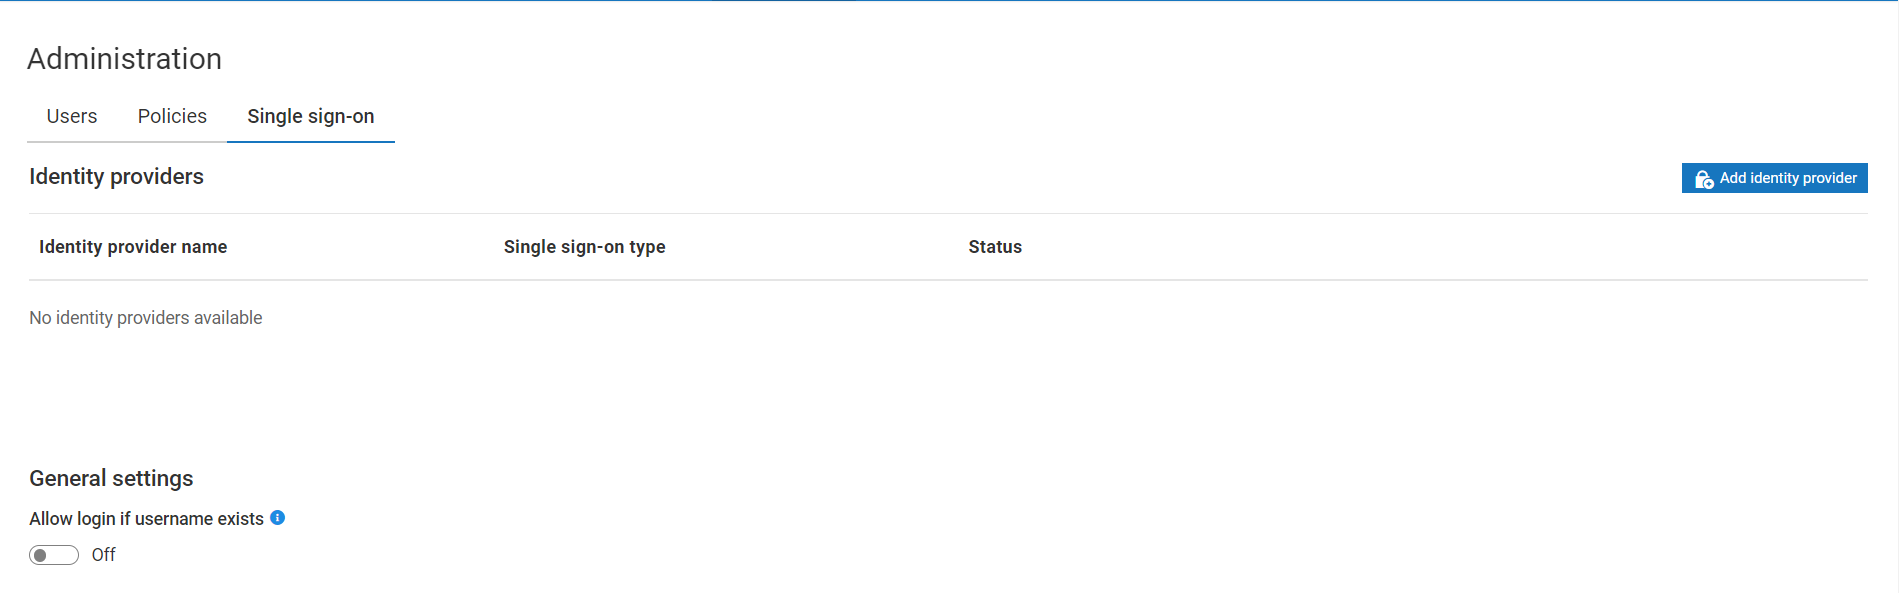
Select Administration
-
Click Single sign-on and Add identity provider. The Add identity provider wizard
appears.
-
Enter your identity provider name and unique identifier details in the Identity provider display
name and Identity provider identifier for use in Software AG Cloud redirect URI fields.


Copy or make a note of the value displayed in the Software AG Cloud redirect URI field.

-
Switch back to PingFederate tab in your browser
-
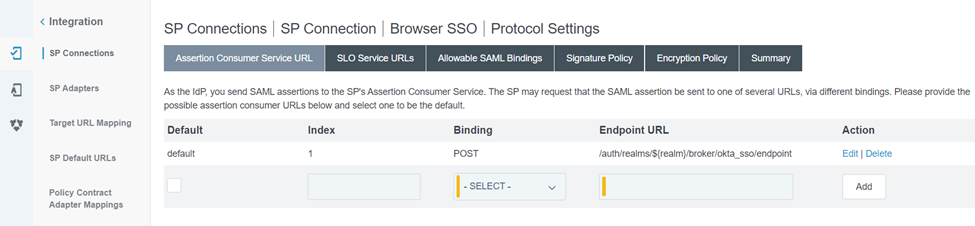
In Assertion Consumer Service URL, check box for default, index as 1, Binding as
POST and enter Software AG Cloud redirect URI from Software AG Cloud tab in
Endpoint URL and click Add
-
In SLO Service URLs select Binding as POST and enter Software AG Cloud redirect
URI from Software AG Cloud tab in Endpoint URL click Add and then click Next. -
In Allowable SAML Bindings check POST and REDIRECT bindings and click
Next. -
In Signature Policy choose the sign assertions to SP and click Next.
-
In Encryption Policy keep settings as default and click Next.
-
In Summary verify the configurations and click Done. You are redirected to
SP connection configuration page, click Next. -
In Credentials click Configure Credentials.
-
In Digital Signature Settings click Manage Certificate.
Here, establish and maintain your server’s signing certificates that are used to sign assertions,
security tokens, requests, and responses.
-
Click Create New if you want to create a self-signed certificate, else click Import if you
have authorized CA signed certificate. For this example, we are listing steps to create a new
self-signed certificate.
1. Click Create New
2. In COMMON NAME enter the hostname field from Software AG Cloud redirect
URI from Software AG Cloud tab.
3. Fill in ORGANIZATION and COUNTRY and click Next.
4. Click Select Action > Export to download this self-signed certificate.
-
In SIGNING CERTIFICATE select the newly created/imported certificate and click Next.
-
In Signature Verification Settings click Manage Signature Verification Settings.
1. In Trust Model select an option based on type of certificate.

2. In Signature Verification Certificate click Manage Certificates and Import the
certificate downloaded in above step, click Next and click Save.
3. Click Done in Certificate Management page, you will be redirected to
Signature Verification Certificate page.
4. In Summary page click Done . You will be redirected to Credentials summary
page , click Done. -
In Activation & Summary verify the details and click Save.
-
You Service Connection details is configured and saved.


Download IdP Metadata file
-
You can download your Identity Provider metadata by clicking on Select Action > Export
Metadata
-
Select certificate from your Signing Certificate drop-down list. Click Next and click Export to download your identity provider metadata.

Importing IdP Metadata and configuring Software AG Cloud
-
Switch back to Software AG Cloud tab in your browser on SSO Configuration page.
-
Select Import configuration from file and browse to the IdpMetadata.xml file path and
click **Next.

-
In Configuration tab review the configuration and click Next.
-
In Attributes tab create a mapping for attributes that must be retrieved from saml assertion
and click Next.

-
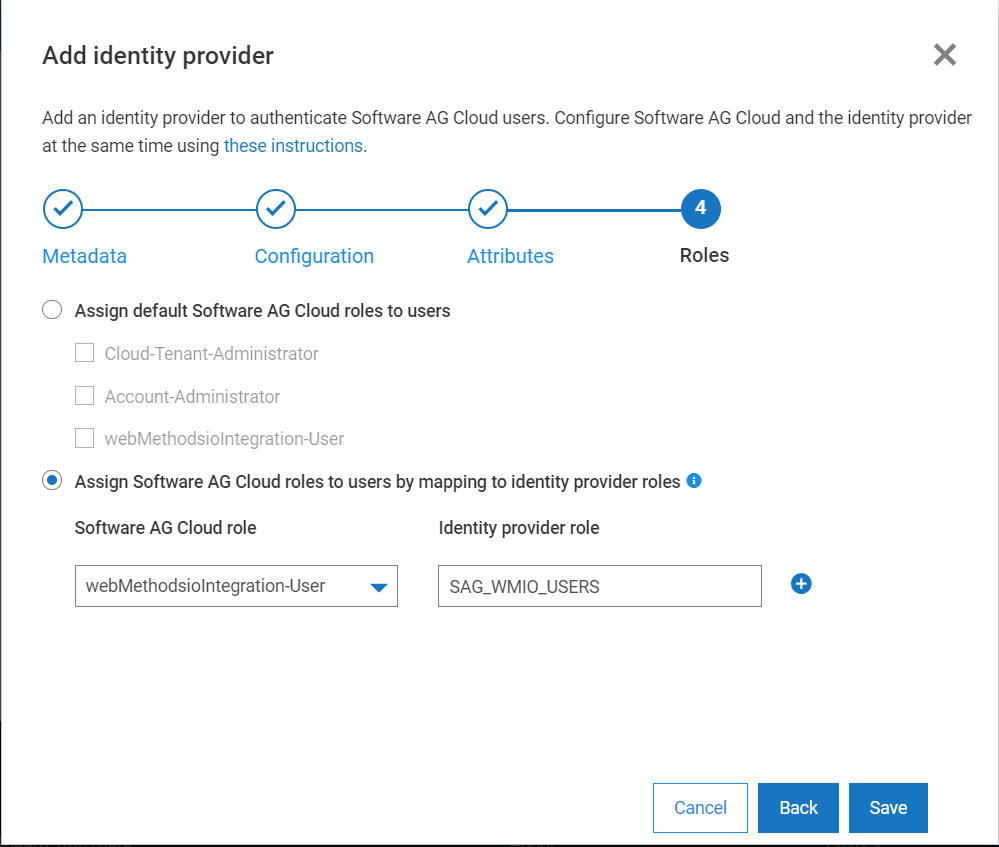
In Roles tab assign a default-role to all onboarded user or creates a mapping between
Software AG Cloud role to identity provider role and click Save
Testing SSO from Software AG Cloud
- Open a browser tab and access the SAG Cloud tenant login page.
- Click on “Login”
- You should now be presented with a page where you can either log in using username/
password, or the new SAML SSO IDP that you just created:

- Click on the new SAML SSO link and provide the login credentials - you should be redirected
to the Ping Federate.